editing digital photos

Digital Photograph Editing Lesson with Sarina - the power of cropping

Photo by Sarina used with permission; cropping by Jason

For our second DSLR Photography Lesson, Sarina and I once again split the lesson time between (first) shooting and then editing.  She had the chance to photograph a dancer (see photo above) since we last met so for the shooting portion of the lesson I gave her feedback and demonstrated more ideal settings she could have used for those shots.  

Then in the editing digital photos half of the lesson I really emphasized how cropping can make a tremendous difference on the overall impact of a photograph.  Plus, cropping is the easiest edit to do on a digital photograph.  Therefore, a photography tip for you is to start your editing process by cropping.  That is what I do.  Many times I do frame the shot in the field exactly how I want, but sometimes once viewing the image on my 24" monitor at home I see the potential for an even better composition.  Or, I decide I want the focus of the image to be on something other than what I originally intended.  

There seems to be hesitation in new photographers to crop off the top of someone's head.  Do not be afraid, it will not hurt them and it will often help your image!  If you are an experienced photographer now, go back and look at your early work.  I bet you will see a progression of always trying to include the entire body or upper half of a person in a portrait to not being afraid to make radical crops that remove large sections of the subject's head.

Cropping in closer creates a stronger connection between viewer and photograph.  In the above example which one of the two feels more personal?  For me, it is the tightly cropped image.

  • Reserve your own 1-on-1 DSLR Photography Lesson with Jason today!
  • Learn more about the lessons
  • Browse past lessons with all of my students
  •  

    --Professional Model DSLR Photography Lessons now available!

    Digital Photograph Editing Lesson with Chris

    Selective contrast edits in Photoshop can make a big impact on your photos - image used by permission 

    Chris took his first DSLR Photography Lesson on Tuesday where we went out into the field to practice shooting.  For our second of four lessons Chris wanted to learn digital photograph editing, which I believe is a very wise thing to do (read more here about my feelings on learning shooting & editing at the same time).

    The cruise ship is Chris' own photograph.  The original is well composed with good contrast in the foreground plants.  However, the cruise ship itself appears to be covered in a haze.  I taught Chris the following techniques using Photoshop CS5 to selectively enhance the cruise ship first, then the water, then finally the sky.

    For the Cruise Ship: 

    • Use the Quick Select Tool (W) to select the entire cruise ship
    • Go to Images --> Adjustments --> Brightness/Contrast
    • Increase contrast to your preference 

    For the Water: 

    • Use the Quick Select Tool (W) to select the entire water area
    • Go to Images --> Adjustments --> Brightness/Contrast
    • Increase contrast to your preference
    • Go to Images --> Adjustments --> Color Balance (Command-B)
    • Enhance the color sliders to your preference

    For the Sky: 

    • Use the Quick Select Tool (W) to select the entire sky
    • Go to Images --> Adjustments --> Color Balance
    • Enhance the color sliders to your preference

    The real key to this type of digital photo editing is the use of selected adjustments.  If we had not selected just the cruise ship, and instead universally adjusted the contrast on the entire photograph, then the plants would have suffered from too much contrast in getting the cruise ship right.  Of course making the sky look a deeper blue if done universally would make even the green plants start to look blue.  Therefore, the key is starting with the Quick Select Tool (W) and selecting only the area you want to adjust.  

  • Reserve your own 1-on-1 DSLR Photography Lesson with Jason today!
  • Learn more about the lessons
  • Browse past lessons with all of my students
  •  

    --Professional Model DSLR Photography Lessons now available!

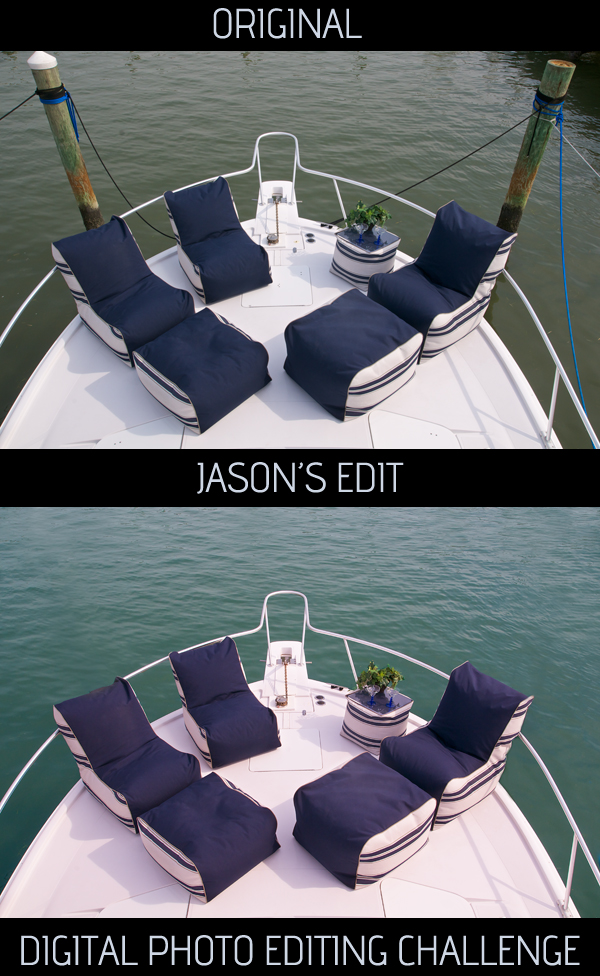
    Digital Editing Challenge 01 - boat bow

    DIGITAL EDITING CHALLENGE is a new feature on Jason Collin Photography.  Download the source photo of the original, then edit it to be as close to my own edit of the photograph.  I fully expect some of you to be able to do an even better job than I did.  Place a link to your edit in the comments below and I will add it to the body of this blog post with name credit.  After the challenge is closed (time to be determined) I will update this blog post with how I made my edit.  Thanks for taking the challenge!

    EDITS THAT NEED TO BE MADE: 

    • basic color & contrast correction
    • removal of poles and ropes
    • change water color 

    GOOD LUCK & THANKS FOR TAKING THE CHALLENGE! 

    • post a link to your edit in the comments below 

    Photography Tip - correct lens distortion & straighten up edges

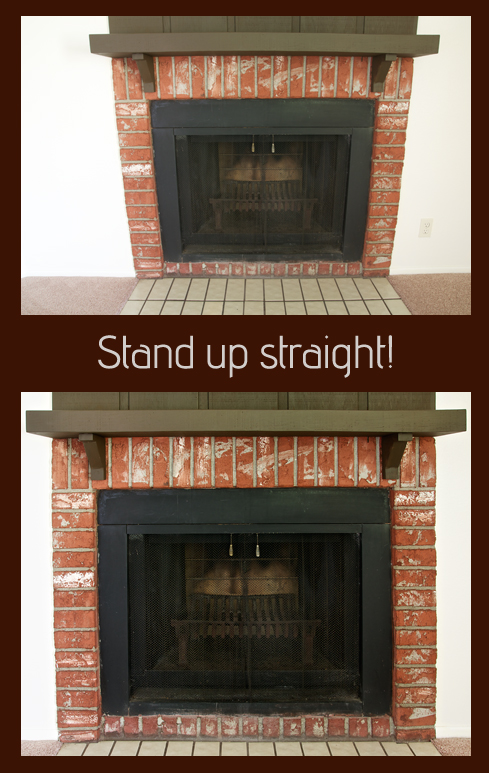
    Using Photoshop CS5 the fireplace was made to appear normal, not distorted by the wide angle lens.

    Wide angle lenses cause distortion.  Depending on the subject of the photograph, the distortion can be very apparent or very hard to notice.  If there are tall straight lines in the photo, especially at the edges of the frame, then the distortion will be very easy to see.  If the photo is free of geometric shapes, then the distortion will not be obvious.  Wide angle lens distortion is very easy to see when photographing buildings or other rectangular shaped objects, like the fireplace above.  It was shot at 17mm causing the walls to pinch inward and the mantle to appear to have a bulge in the center.  Here is how I used Photoshop CS5's lens correction filter to straighten it up:

    Click on the image for a larger version - Photoshop CS5's lens correction window with grid onIn Photoshop CS5, the keyboard shortcut for launching the lens correction filter is SHIFT-CMD-R.  Or, you can just go into the Filters menu and select it there.  The auto correction by choosing camera and lens model does not work for me, so I always go into the custom tab.  For the Tamron 17-50mm f/2.8 lens I used for wide angle shooting, I always have to Put the Geometric Distortion slider into positive territory, as I did here (+7).  Then what I do from there depends on the individual shot, but I mostly adjust the Vertical and Horizontal Perspective sliders as needed.  I turn the Show Grid option on and adjust those sliders as needed until a horizontal/vertical line in the photo becomes parallel with a horizontal/vertical grid line.  I also toggle Preview on and off to see the differences made.  Click OK and Photoshop does the rest!  

    Lens Correction Workflow:

    • SHIFT-CMD-R in CS5 to launch the lens correction filter
    • Toggle on Preview and Show Grid
    • Slide Remove Distortion to positive side as needed
    • Adjust Vertical/Horizontal Perspective sliders as needed following grid lines for guidance

    Practice yourself!

    Show us your practice results with a link in the comments below.  If you correct one of your own images send me a 600px wide version of the original and corrected one and and I will feature it in this post.

    Photography Tip - Use Photoshop Clone Stamp Tool to clean backgrounds

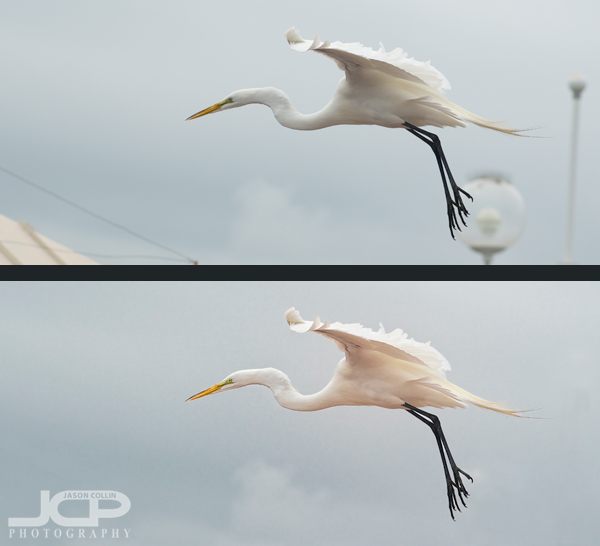
    Top: the original RAW image Bottom: after using clone stamp tool to clean background

    When I go around saying digital photography editing skills are 50% of what you need to produce a satisfactory final image, I really mean it even though every other photographer around would probably disagree with that.  I invite you to look at the above before and after shots and tell me in the comments below what percent digital editing had in helping the final image be all it could be.  

    For this photography tip I will just concentrate on: 

    • how I used the clone stamp tool in Photoshop CS5 to clean up the background, i.e. removing the light posts and wires 

    When I first pulled up this photo in Aperture 3, I really liked the bird in flight action.  The great egret was caught in an unusual mid-flap wing position.  However, the background was not clean and the egret's feet were overlapping a light post.  Then there was the corner of a roof intruding in the lower left of the frame.  Finally, there was a single tall light post on the right of the frame that was another distraction.  

    To me the two things that really make a photograph of a common subject matter standout are light and background.  You need good light for a flattering exposure and a clean background to let the subject stand out.  While it is entirely possibly to be at a location where one can get both of these things just right, I, myself, do not want to be limited to just those exact right circumstances.  Hence, I have worked on my clone stamp skills with earnest.  

    Now, if you have used the clone stamp tool in Photoshop you know it kind of has a mind of its own.  It almost never works like you want it too, especially if you use it in broad strokes.  First, in order to be able to use the clone stamp tool, you must have a source area in your photo you can sample from.  In the great egret shot, I have plenty of other gray clouds to sample to later stamp onto the light posts.  Really this is an ideal shot for using the clone stamp tool to fix because of the ample source cloning material, the relatively small amount of area that needs to be stamped on, and the fact that the subject does not much overlap any of the background distractions (just a bit of feet do).  

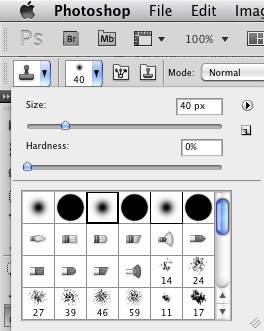
    The shortcut for selecting the clone stamp tool is "S" and the key to using Photoshop efficiently is learning as many keyboard shortcuts as you can.  To change the size of the brush use the bracket keys:  ] and [   To sample an area hold the Option key (on a Mac) then click on the desired spot.  I very rarely use the clone stamp at 100% as that makes is hard to control and often artifacts are introduced.  For this shot I mostly used 80% opacity.  Once I sampled a cloud I stamped in ver short strokes, never more than one or two at a time.  Then I would go back and sample the same or another area.  Also, I almost always use a soft brush (see screenshot).  

    So to summarize how I use the clone stamp tool in Photoshop CS5: 

    • "S" to select it
    • [ ] to change brush size
    • type 8 to change opacity to 80%, etc
    • Option-click to sample an area
    • Use short strokes
    • Resample every one or two strokes as needed 

    Try this clone stamping technique on one of your photos and post a link in the comments below to a before and after shot, or e-mail the shot to me and I will include it in this post.

    Photography Tip - use filters when editing for great quick results

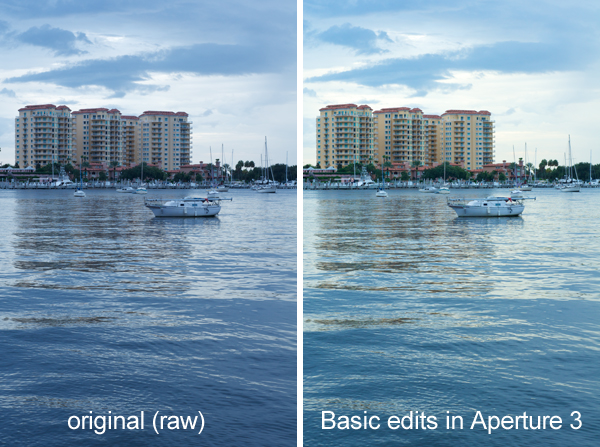
    Nikon D300 Nikkor AF 50mm f/1.8D ISO 400 1/60th - sailboats of St. Petersburg HarborFor this digital photography editing tip I am using a photograph that was made in an unusual way and breaks a few rules.  Typically for a landscape, fine art type photograph I would of course mount my DSLR on a tripod and probably use a cable release and wide angle lens too.  For this photograph I was shooting handheld with a 50mm prime lens, and in portrait orientation to boot.  At the time I was teaching a DSLR photography lesson to a student preparing for a trip to Costa Rica and he would not be bringing a tripod.

    This photograph had been lying around unedited for five months, which means I did not love it, but something about it made me want to not just delete it right away.  Maybe it is the completely empty foreground and the use of portrait orientation, or because of the sailboat with a lowered mast in the middle.  Either way, I will in the following describe my simple and fast editing method of using filters.

    The first step was importing the RAW file into Aperture 3.  If you use an app like Aperture 3, then shooting in RAW requires no extra work over just shooting in jpg.  So you get all the benefits of shooting in RAW, with no big work required on your part because Aperture 3 upon file import applies a RAW processing profile based on your specific DSLR right to the file.  No mess no fuss.  So there is absolutely no excuse not to shoot in RAW.  The myth of RAW being extra work is gone!  

    Here are the next steps I took in Aperture 3

    • straighten the horizon (right side was low)
    • adjust exposure and vibrance sliders
    • use the temperature slider to add warmth (image was too blue) 

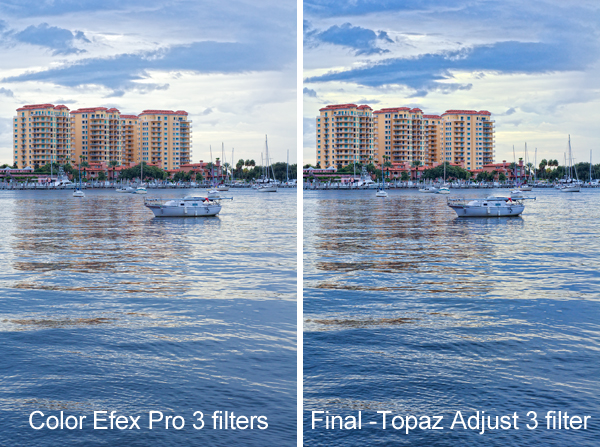
    After doing super easy and basic slider adjustments in Aperture 3, I then launch Color Efex Pro 3 which is a plugin I have right inside Aperture 3.


    The filters I used in order in Color Efex Pro 3

    • Polarization
    • Remove Color Cast
    • Tonal Contrast 

    After finishing things up in Color Efex Pro 3, I export the image as a TIFF right into Photoshop CS5 where I applied a 60% unsharp mask filter.  Then from right within Photoshop CS5 I launched Topaz Adjust 3 and applied the "Photo Pop" filter.  The last little thing I did to the image was use the dodge brush in CS5 set for midtones at 20% to brighten up the condos a little more, and the shoreline too.

    This is basically the editing process I do on every single photograph I edit, save for using Topaz Adjust which is only used once in a great while.  One or two of the filters may change in Color Efex Pro, and I may adjust different sliders in Aperture 3, but I think this is a streamlined, easy and effective editing process.  

    Please try this editing process out on one of your own images and post a link to the results in the comments below.

    Digital Photograph Editing Lesson with Eric

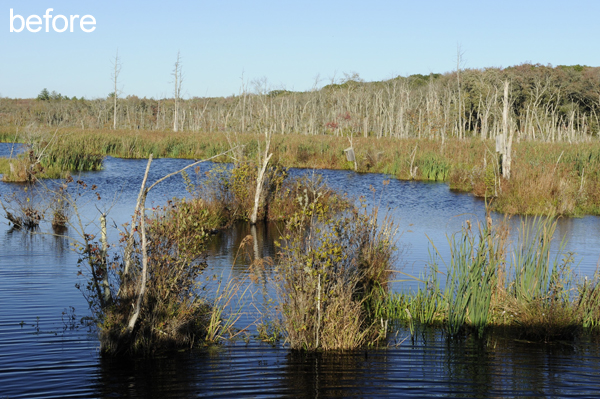
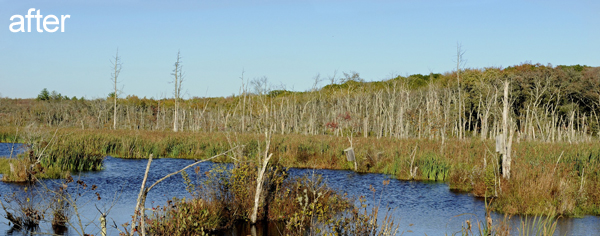
    A New England wetlands scene edited using Aperture 3 - photo by Eric used with permissionFor Eric's second DSLR photography lesson (first), he brought some photos of his recent visit to various New England areas with him on his laptop.  We found a spot at an outdoor downtown St. Petersburg cafe and starting going through his shots made using his Nikon D300s.  The one featured above was taken when Eric hopped off his bike (bicycle) because he wanted to remember the beautiful scenery he was riding through.  Upon first look at the shot, I liked the sine wave shape of the treeline, but thought the foreground was dominating the image too much and not the best feature to focus one's eye on.

    So we began by making the panoramic crop you see above, that eliminated many of the distracting foreground elements, and also made a shot that was not taken at a wide angle appear to be of a much wider landscape.  Adjusting various filters added some contrast and tones to the marsh grass.  Painting with the polarizing brush in Aperture 3 brought back some blue to the sky.  

    This is another example of why I highly suggest that one learn how to shoot well and how to edit well simultaneously.  Eric cannot easily return to that marshland to frame the shot in a different way, but with editing skills he can improve a shot and make it look more like what he initially envisioned.

    For more on learning editing and shooting simultaneously check out this blog post featuring my own photo example.

    I look forward to seeing how Eric puts these editing skills to use in future shots. 

  • Reserve your own 1-on-1 DSLR Photography Lesson with Jason today!
  • Learn more about the lessons
  • Browse past lessons with all of my students