CS5

Introduction to Photoshop CS5 Basics & Keyboard Shortcuts with Ed

Grand Tetons photograph by Ed, editing by Jason - the lens correction filter in Photoshop CS5 sets things straight 

I received a phone call from Ed all the way in Jacksonville (about 3 hours away) asking about taking extended 1-on-1 Photoshop CS5 lessons.  I am not a certified Photoshop expert or anything like that so at first I wanted to make sure he was not looking to learn how to do something like someone's face and put it onto another person's body.  My Photoshop skills lie mostly in the areas that pertain to editing digital photographs, not graphic design.  After talking for a few minutes though I realized that what Ed wanted to learn I could most definitely teach.  We booked two lesson sessions, one for today and another for tomorrow.

Ed had his own photos to use during the editing lesson and I was pleasantly surprised to see the Grand Tetons.  Florida photographers of course have no local opportunities to photographs mountains of any kind.  Ed's photographs already looked good, but there is almost always something that can be done to improve any photograph, and for sure any published or portfolio photograph by a serious hobbyist or a pro has had at least some editing done to it.  I am not afraid to say that editing is often 50% responsible for the final look of a photograph.  

The example above did not need that 50% level of editing.  I showed Ed my workflow which starts with cropping (I cropped the photo even more here than I did during the lesson to better show the edits we made) and then removing any dust spots on the sensor that appear as dirt blemishes in the photo by using the healing brush (keyboard shortcut - j).  Then I taught how to use the quick select tool (w) to highlight only the mountains for a contrast adjustment.  Then the foreground grass and fence were selected for a color balance boost.  Lastly, we used unsharp mask to increase the overall sharpness of the image resulting in more defined blades of grass and details in the fence and mountains.  

Tomorrow we will move on to editing portraits and using layer masks.  

  • Reserve your own 1-on-1 DSLR Photography Lesson (shooting or editing) with Jason today!
  • Learn more about the lessons
  • Browse past lessons with all of my students
  •  

    --Professional Model DSLR Photography Lessons now available!

    Digital Photograph Editing Lesson with Chris

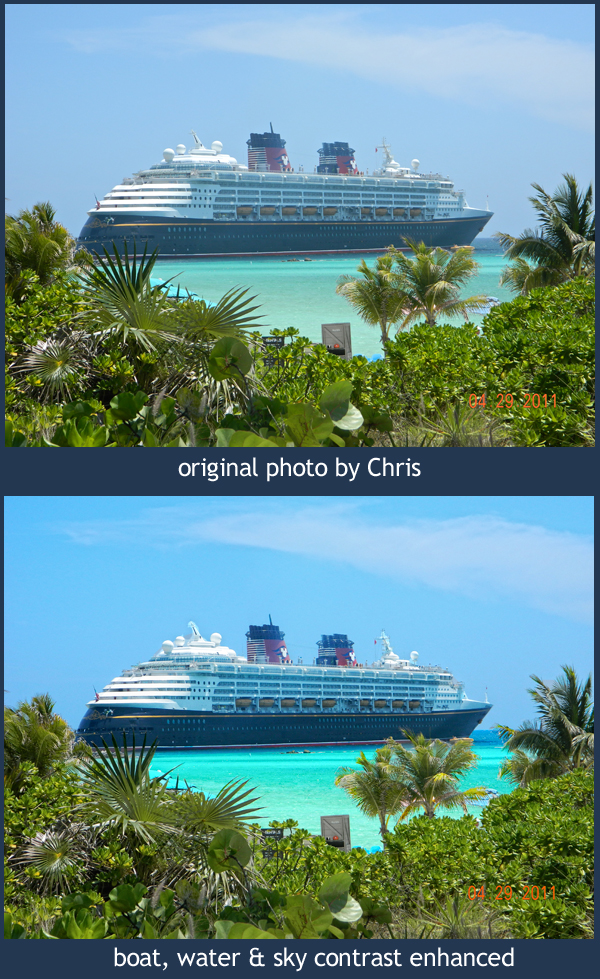
    Selective contrast edits in Photoshop can make a big impact on your photos - image used by permission 

    Chris took his first DSLR Photography Lesson on Tuesday where we went out into the field to practice shooting.  For our second of four lessons Chris wanted to learn digital photograph editing, which I believe is a very wise thing to do (read more here about my feelings on learning shooting & editing at the same time).

    The cruise ship is Chris' own photograph.  The original is well composed with good contrast in the foreground plants.  However, the cruise ship itself appears to be covered in a haze.  I taught Chris the following techniques using Photoshop CS5 to selectively enhance the cruise ship first, then the water, then finally the sky.

    For the Cruise Ship: 

    • Use the Quick Select Tool (W) to select the entire cruise ship
    • Go to Images --> Adjustments --> Brightness/Contrast
    • Increase contrast to your preference 

    For the Water: 

    • Use the Quick Select Tool (W) to select the entire water area
    • Go to Images --> Adjustments --> Brightness/Contrast
    • Increase contrast to your preference
    • Go to Images --> Adjustments --> Color Balance (Command-B)
    • Enhance the color sliders to your preference

    For the Sky: 

    • Use the Quick Select Tool (W) to select the entire sky
    • Go to Images --> Adjustments --> Color Balance
    • Enhance the color sliders to your preference

    The real key to this type of digital photo editing is the use of selected adjustments.  If we had not selected just the cruise ship, and instead universally adjusted the contrast on the entire photograph, then the plants would have suffered from too much contrast in getting the cruise ship right.  Of course making the sky look a deeper blue if done universally would make even the green plants start to look blue.  Therefore, the key is starting with the Quick Select Tool (W) and selecting only the area you want to adjust.  

  • Reserve your own 1-on-1 DSLR Photography Lesson with Jason today!
  • Learn more about the lessons
  • Browse past lessons with all of my students
  •  

    --Professional Model DSLR Photography Lessons now available!
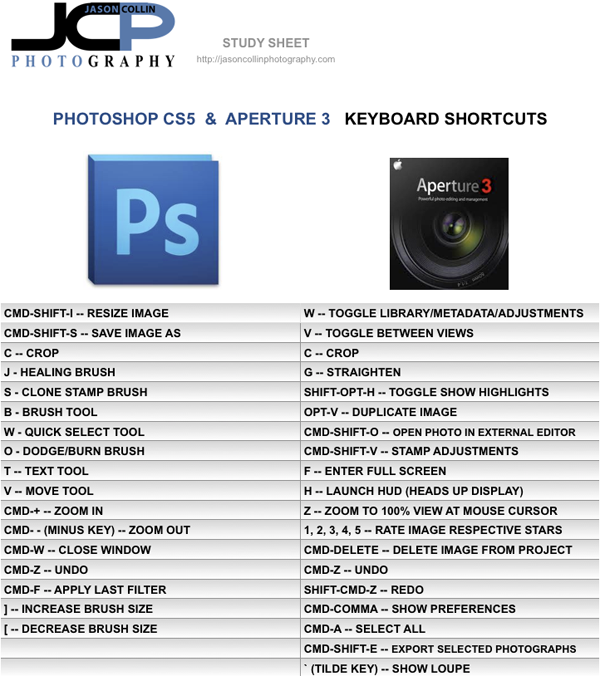
    Aperture 3 and Photoshop CS5 Keyboard Shortcuts Quick Guide

    DOWNLOAD PDF version

    Aperture 3 and Photoshop CS5 are two key applications in my digital photo editing workflow.  I have been increasingly teaching my DSLR photography students my post processing workflow, in addition to in the field making photograph lessons.  I rely heavily on keyboard shortcuts for greatly speeding up my editing, which is necessary when I have to deliver hundreds of images to clients in a short period of time.  

    So I put together a quick guide of the keyboard shortcuts I most commonly use in Aperture 3 and Photoshop CS5.  Most of these keyboard shortcuts should also work in older versions.  I learned them by looking through the menus and seeing the shortcut letter, by accident and by reading other photography websites.  

    Let me know any additional keyboard shortcuts you use in the comments below. 

  • More photography tips
  • Reserve your own 1-on-1 DSLR Photography Lesson with Jason today!
  • Learn more about DSLR photography lessons
  • Browse past lessons with all of my students