
The past few weeks I have been teaching former Morean Arts Center photography student, Stacy, how to develop a Mac digital photo editing workflow. She is new to Mac as well, so I have been showing her some of my top tips for using OS X as efficiently as possible (hint, use Expose every day). She also got the same apps I have so she could learn my exact photo editing workflow which starts in Aperture 3, then Color Efex Pro 3, then finally Photoshop CS5.
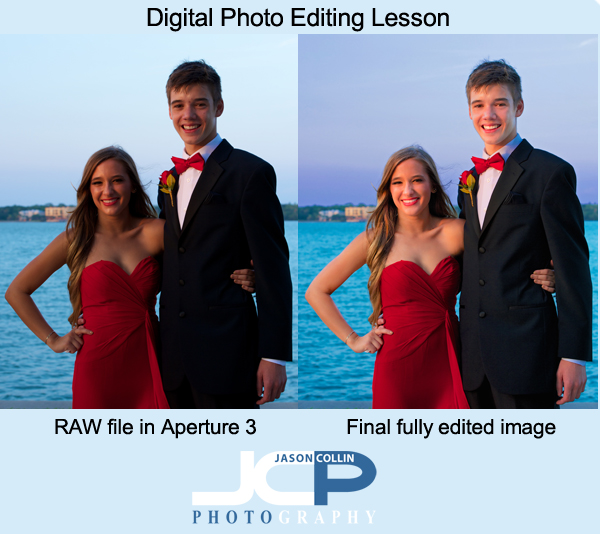
Stacy made this photo of her daughter and her boyfriend on their junior prom night. No flash was used, only natural light. Here is the process for how the photo was transformed:
Aperture 3 workflow:
- white balance slider increased toward cooler (blue)
- shadows slider increased
- mid-level contrast slider increased
- dodging brush used on all skin areas
Color Efex Pro 4 (she has 4, I use 3):
- Polarization filter applied
- Pro Contrast filter applied
Photoshop CS5 (approximate steps):
- Quick Select Tool used on all skin areas
- Dodge Brush used selectively
- Healing Brush used for blemish removal
- Clone Stamp Tool used for more complex blemish removal and slight skin softening in general
- Dodge Brush used in highlights mode to brighten eyes & teeth
- Clone Stamp Tool used to lighten under the eyes
- Quick Select Tool used on water
- Contrast adjustment made selectively to water
- Quick Select Tool used on sky
- Highlights adjustment made selectively to sky
- Saturation adjustment made selectively to sky
- Unsharp Mask filter applied
None of these individual techniques is advanced. To a properly trained Photoshop professional they might even seem crude. However, what each technique lacks in complexity, the complexity comes from knowing when and how to use each one to accomplish a photo retouching goal. At each stage of editing the photo looked better. Through experience it can be learned how to keep adding yet another stage to one's editing workflow to make a photograph reach its full potential, or in some cases, save a photo that would otherwise be culled.
