Photoshop

Photography Tip - correct lens distortion & straighten up edges

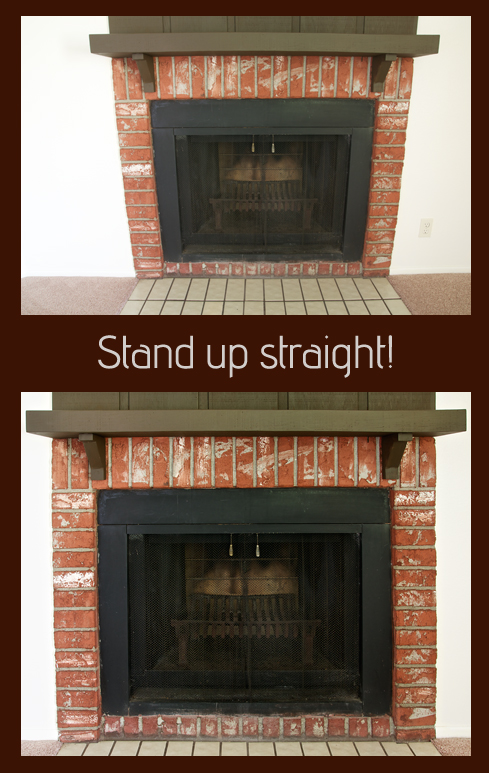
Using Photoshop CS5 the fireplace was made to appear normal, not distorted by the wide angle lens.

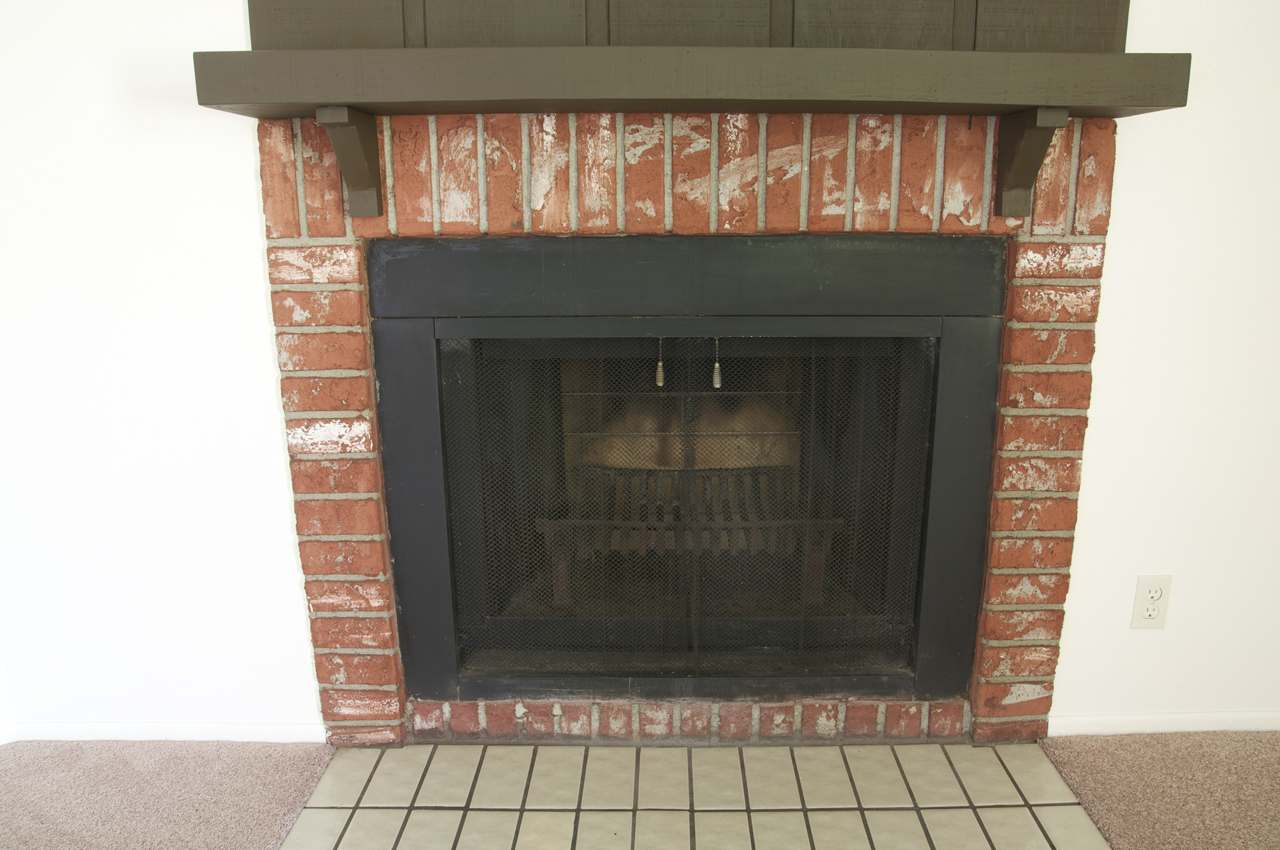
Wide angle lenses cause distortion.  Depending on the subject of the photograph, the distortion can be very apparent or very hard to notice.  If there are tall straight lines in the photo, especially at the edges of the frame, then the distortion will be very easy to see.  If the photo is free of geometric shapes, then the distortion will not be obvious.  Wide angle lens distortion is very easy to see when photographing buildings or other rectangular shaped objects, like the fireplace above.  It was shot at 17mm causing the walls to pinch inward and the mantle to appear to have a bulge in the center.  Here is how I used Photoshop CS5's lens correction filter to straighten it up:

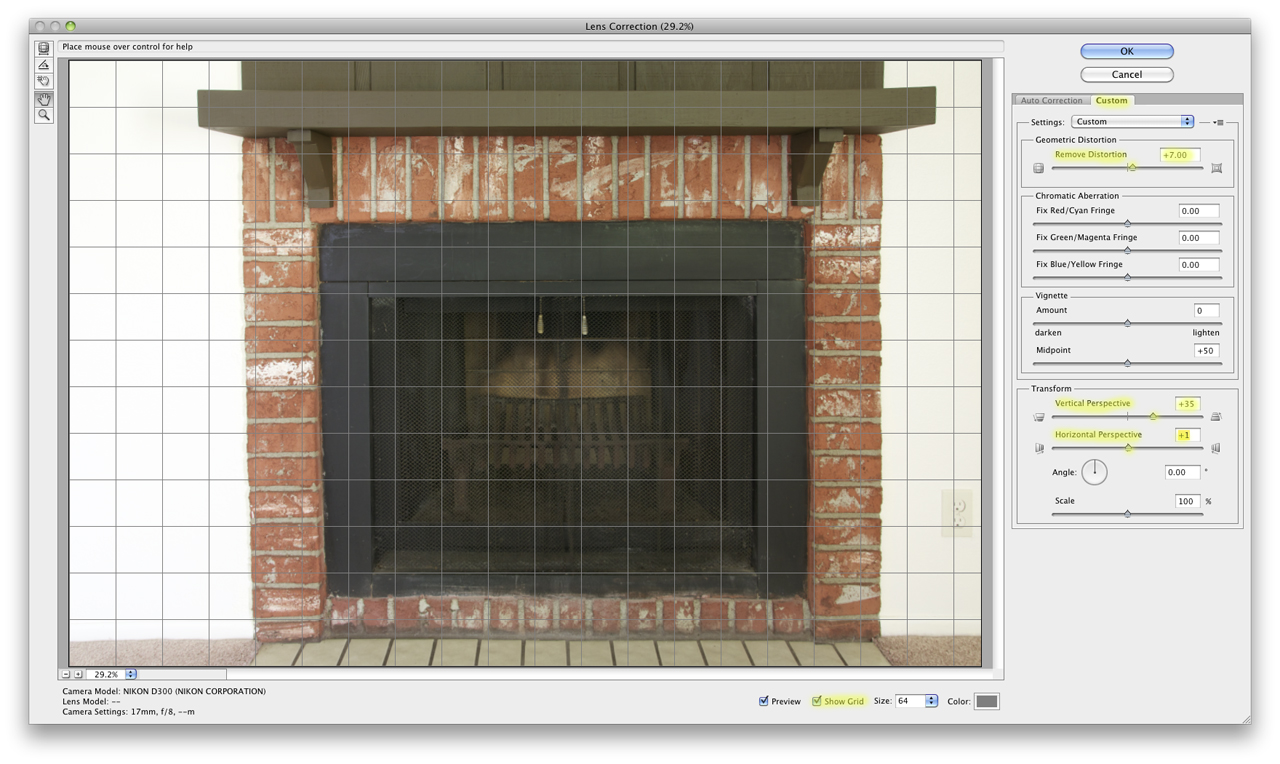
Click on the image for a larger version - Photoshop CS5's lens correction window with grid onIn Photoshop CS5, the keyboard shortcut for launching the lens correction filter is SHIFT-CMD-R.  Or, you can just go into the Filters menu and select it there.  The auto correction by choosing camera and lens model does not work for me, so I always go into the custom tab.  For the Tamron 17-50mm f/2.8 lens I used for wide angle shooting, I always have to Put the Geometric Distortion slider into positive territory, as I did here (+7).  Then what I do from there depends on the individual shot, but I mostly adjust the Vertical and Horizontal Perspective sliders as needed.  I turn the Show Grid option on and adjust those sliders as needed until a horizontal/vertical line in the photo becomes parallel with a horizontal/vertical grid line.  I also toggle Preview on and off to see the differences made.  Click OK and Photoshop does the rest!  

Lens Correction Workflow:

  • SHIFT-CMD-R in CS5 to launch the lens correction filter
  • Toggle on Preview and Show Grid
  • Slide Remove Distortion to positive side as needed
  • Adjust Vertical/Horizontal Perspective sliders as needed following grid lines for guidance

Practice yourself!

Show us your practice results with a link in the comments below.  If you correct one of your own images send me a 600px wide version of the original and corrected one and and I will feature it in this post.

Photography Tip - Use Photoshop Clone Stamp Tool to clean backgrounds

Top: the original RAW image Bottom: after using clone stamp tool to clean background

When I go around saying digital photography editing skills are 50% of what you need to produce a satisfactory final image, I really mean it even though every other photographer around would probably disagree with that.  I invite you to look at the above before and after shots and tell me in the comments below what percent digital editing had in helping the final image be all it could be.  

For this photography tip I will just concentrate on: 

  • how I used the clone stamp tool in Photoshop CS5 to clean up the background, i.e. removing the light posts and wires 

When I first pulled up this photo in Aperture 3, I really liked the bird in flight action.  The great egret was caught in an unusual mid-flap wing position.  However, the background was not clean and the egret's feet were overlapping a light post.  Then there was the corner of a roof intruding in the lower left of the frame.  Finally, there was a single tall light post on the right of the frame that was another distraction.  

To me the two things that really make a photograph of a common subject matter standout are light and background.  You need good light for a flattering exposure and a clean background to let the subject stand out.  While it is entirely possibly to be at a location where one can get both of these things just right, I, myself, do not want to be limited to just those exact right circumstances.  Hence, I have worked on my clone stamp skills with earnest.  

Now, if you have used the clone stamp tool in Photoshop you know it kind of has a mind of its own.  It almost never works like you want it too, especially if you use it in broad strokes.  First, in order to be able to use the clone stamp tool, you must have a source area in your photo you can sample from.  In the great egret shot, I have plenty of other gray clouds to sample to later stamp onto the light posts.  Really this is an ideal shot for using the clone stamp tool to fix because of the ample source cloning material, the relatively small amount of area that needs to be stamped on, and the fact that the subject does not much overlap any of the background distractions (just a bit of feet do).  

The shortcut for selecting the clone stamp tool is "S" and the key to using Photoshop efficiently is learning as many keyboard shortcuts as you can.  To change the size of the brush use the bracket keys:  ] and [   To sample an area hold the Option key (on a Mac) then click on the desired spot.  I very rarely use the clone stamp at 100% as that makes is hard to control and often artifacts are introduced.  For this shot I mostly used 80% opacity.  Once I sampled a cloud I stamped in ver short strokes, never more than one or two at a time.  Then I would go back and sample the same or another area.  Also, I almost always use a soft brush (see screenshot).  

So to summarize how I use the clone stamp tool in Photoshop CS5: 

  • "S" to select it
  • [ ] to change brush size
  • type 8 to change opacity to 80%, etc
  • Option-click to sample an area
  • Use short strokes
  • Resample every one or two strokes as needed 

Try this clone stamping technique on one of your photos and post a link in the comments below to a before and after shot, or e-mail the shot to me and I will include it in this post.

Photography Tip - Rockin out Photoshop faux Polaroid template

Having a little fun with a Polaroid Photoshop templateA couple of times a year I get the urge to experiment with Photoshop.  This time I was searching for postcard templates.  I did not find any of those that I liked (I ended up designing my own), but I did find this faux Polaroid Photoshop template.  For awhile I was keeping a photo of some keyboardist-singer hanging around that I took a few months ago wondering what I could do with it.  I liked the emotion, but I could not really find a fit for it.  After I found the faux Polaroid template, I thought they might go together.

HOW TO CREATE YOUR OWN FAUX POLAROID PHOTOGRAPH

First, download the faux Polaroid template from this site.  Then open up the .psd file in Photoshop.  Also open up the photograph you want to use in the template in Photoshop too.  The faux Polaroid template has quite a few layers to it, not all of them I chose to keep.  

Using the quick select tool with these settings in the screencap above, I clicked on the layers I did not want and then just hit the delete key.  Now the template was ready for the photo to be inserted.  There was some resizing prep-work to be done on the photo first before it could be inserted into the template, however.  I resized the faux Polaroid template to 600px wide (the size of all images on the blog).  

Then I measured the actual pixel space available in the template, represented by the black area seen above.  I cropped the photo to just a few pixels less in each dimension then resized it.  Then it was just a matter of using the quick select tool to drag the photo onto the open black space on the template.  The last thing I did was change the text caption.

I once again selected the template layer with the quick select tool.  Then used the horizontal type tool to write "ROCKIN' OUT!" using the Chalkduster font.  

Here is the final image again:

Aperture 3 and Photoshop CS5 Keyboard Shortcuts Quick Guide

DOWNLOAD PDF version

Aperture 3 and Photoshop CS5 are two key applications in my digital photo editing workflow.  I have been increasingly teaching my DSLR photography students my post processing workflow, in addition to in the field making photograph lessons.  I rely heavily on keyboard shortcuts for greatly speeding up my editing, which is necessary when I have to deliver hundreds of images to clients in a short period of time.  

So I put together a quick guide of the keyboard shortcuts I most commonly use in Aperture 3 and Photoshop CS5.  Most of these keyboard shortcuts should also work in older versions.  I learned them by looking through the menus and seeing the shortcut letter, by accident and by reading other photography websites.  

Let me know any additional keyboard shortcuts you use in the comments below. 

  • More photography tips
  • Reserve your own 1-on-1 DSLR Photography Lesson with Jason today!
  • Learn more about DSLR photography lessons
  • Browse past lessons with all of my students 
  • Aperture Digital Photograph Editing Lesson with Kathleen

    Photo by Kathleen, Editing by Jason - red barn in Ohio before and after using Aperture & PhotoshopMy DSLR Photography students are increasingly wanting to learn how to edit their photographs, in addition to how to use their DSLRs out in the field.  I am of course very happy about this as I highly recommend learning to shoot and edit simultaneously (read here).  I always say that publishing and printing photographs "straight out of the camera" or "getting everything right in camera" are nice myths that never existed, not even in the film days.  Of course one should show skill in the field and produce a very well exposed and composed shot in camera.  I do believe in the common axim of today that one should not think, "oh, I'll just fix that in Photoshop later."  If you realize a flaw in the field, do your best to get it fixed/corrected right then and there.  I often shoot weddings on beaches, if I can pause for 5 seconds to let a person passing by in the background get out of the frame, I will totally do that rather than thinking, "I'll just clone them out at home."  Cloning out the person would take a lot longer than 5 seconds!

    Kathleen took a shooting-based DSLR photography lesson back in early June.  Since then she had been shooting some scenery in Ohio, including old barns (above).  She requested a lesson on editing and since she is an Aperture user as I am, I could show her my exact workflow from importing photographs to producing a finished photograph.  We also mixed in Photoshop (Elements) into her workflow from right within Aperture.  

    The red barn is her photograph.  What I showed her in Aperture was getting the exposure and contrast corrected to remove what I call the "gray film" that coats many digital photographs, especially those taken on overcast days.  Note the overall lack of a dull gray cast on the bottom photo.  This is usually the number one flaw I see in people's digital photographs, the dull gray film coating.  

    Next we gave the image a little pop using the vibrancy slider in Aperture and then started to bring in some details using the definition slider.  At that point we exported the image to Photoshop (Elements for her, CS5 for me) right from within Aperture and worked on selective editing.  We selected the red barn walls and adjusted the contrast just on that part to bring in even more detail and pop without effecting the rest of the image.  We did the same to the roof, but that did not cause much change.  Lastly, we applied unsharp mask (my preferred sharpening method) which brought even more detail, especially in the window shutters.  

    I also taught Kathleen all the keyboard shortcuts that are massive time savers when using complicated, multi-tool apps like Aperture and Photoshop.  She filled a whole notebook page with them.  We have already scheduled our next editing lesson for two weeks from now! 

  • Reserve your own 1-on-1 DSLR Photography Lesson with Jason today!
  • Learn more about the lessons
  • Browse past lessons with all of my students