editing digital photos

Jumping Matrix Style with help from layer masks

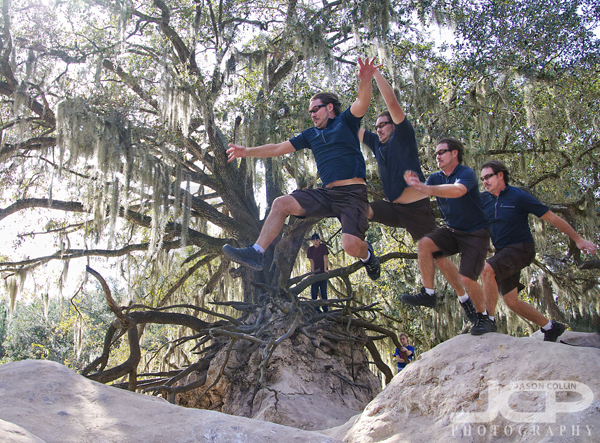
Yours truly leaping a chasm! This is a blending of 4 different action shots using a simple layer mask technique.In case you missed it last week, I do take time away from being behind the camera to continue my love of rock hopping and leaping objects (see here).  I made the leap over the above chasm-ish span several times each time trying to go further.  I did not actually move fast enough to be seen multiple times in 1/500th of a second.  How I made the above image was to combine four of the shots taken in one burst of shots on my Nikon D300 (capable of 6 frames per second).  Since the DSLR was on a tripod all the background matched up perfectly, as does the exposure since that was set manually.  The only thing moving over the series of shots was me.  Then, it was just a matter of using layer masks in Photoshop to produce the multiple exposure, or Matrix, looking image.

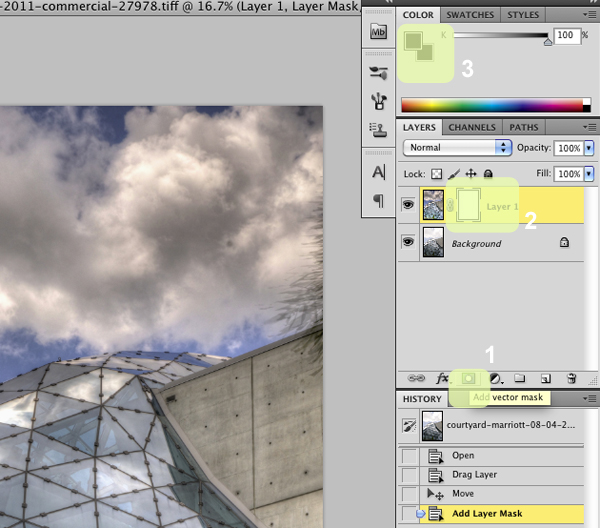
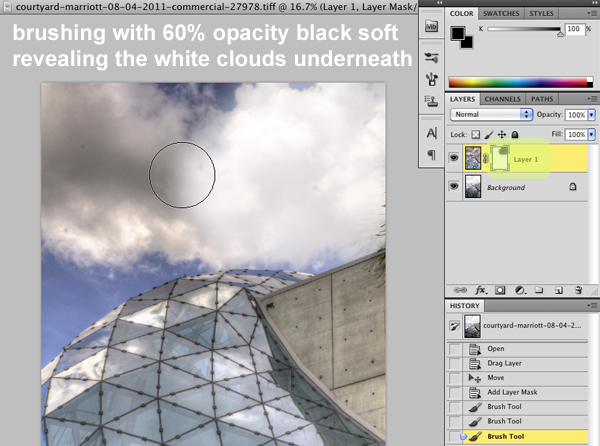
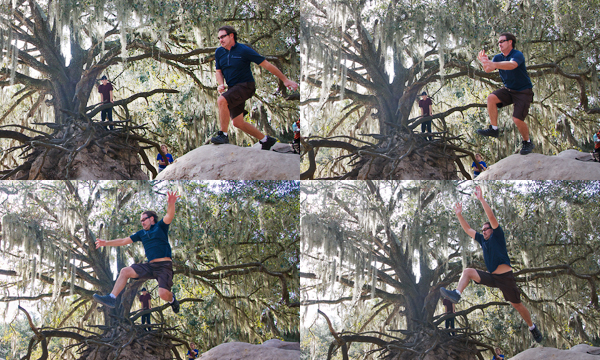
These shots layered on top of each other produced the above shot.Using layer masks to blend multiple images is not a difficult type of digital photography editing.  I have written a tutorial on how to use layer masks here.  Give this photography tip a try and post your results in the comments below!

How to fix black clouds in HDR images using layer mask

HDR photography and images are very popular right now.  I, myself, have participated in a local exhibition featuring only HDR images.  The thing is, I do not care for 90% of HDR photography I see.  There is a large debate about processing HDR images to look more real or more hyper real.  I am not referencing that debate here.  For me, a simple reason why I do not find a vast majority of HDR images appealing is because they suffer from horrible shadow effects as demonstrated in the black clouds in the center image above.  As you can see with the single exposure photo, the sky looks good, but there is no detail inside the glass.  The 7-bracket HDR image reveals what is under the glass and adds better color, but at the expense of the clouds.  Therefore, the best final results come from blending the single exposure photo with the 7-bracket HDR image.

1. click on add layer mask (sorry, shows vector) 2. click on layer 1 3. paint with a black brushBlending two images together is not a difficult time consuming process using Photoshop.  The screenshots in this post are using CS5, but other versions should basically be the same.

First, open the single exposure photo and 7-bracket HDR image in Photoshop.  Drag the 7-bracket HDR image on top of the single exposure photo.  Once you do this you will only see the 7-bracket HDR image.  The single exposure photo is completely hidden underneath.  Our goal is to reveal only the parts of the single exposure photo we want, in this case, the clouds and sky.

After you have dragged the 7-bracket HDR image on top of the single exposure photo, follow the three steps highlighted in the screenshot above: 

  1. Click on "Add layer mask"
  2. Click on "Layer 1"
  3. Select the Brush tool: soft brush setting, black, 60% opacity (or similar, just not 100%) 

Now using the Brush tool at the settings described above, slowly brush the areas you want to reveal.  The 7-bracket HDR image starts to disappear revealing the single exposure photo below.  In the above screenshot you can see that I already revealed the nice white clouds on the right side.  Here is an extra tip:  I also used the Brush tool on the concrete wall of the building that looked too black & dirty to reveal the cleaner wall from the single exposure photo.  If you make a mistake and reveal something you did not want to, set the Brush color to white and the top image will return.

Here again are the before and after results.  By using a layer mask you can create a dynamic hdr image and still maintain the clean look of clouds, walls, etc in the image.  This vector mask technique is great for other photography tricks too.  Want to change the background on a portrait?  You can do that following this same process! (see results here)

Try the vector mask process on some of your images and be sure to post links to the results in the comments below. 

  • Read more photography tips
  • Reserve your own 1-on-1 DSLR Photography Lesson with Jason today!
  • Learn more about the lessons
  • Color Efex Pro 3 - Make Fake Autumn in the Park

    Kiki running on grass turned brown by Color Efex Pro 3 - Nikon D300 Nikkor AF-S 105mm VR micro f/2.8G @ f/2.8 ISO 400 1/800thI really like that Florida is such a green and lush place nearly year round.  This, however, means there is a near complete absence of autum colors.  At Walsingham Dog Park last weekend, even though it was in the second half of November, all was as green as always.  However, as you can see, Kiki is running on brown grass.  This transformation was done with just one mouse click.

    I really recommend the plugin app Color Efex Pro 3.  I have it for Aperture 3 and use its filters on everyone of my photographs.  It is very easy to use wiht a list of filters on the left that are applied with a single click.  The effects can be modified down to very fine details if desired by using the fine tuning controls on the right column.  The "Indian Summer" filter does just one thing - turn greens to browns.  So with just the application of that single, simple filter, photographs can have that autumn look to them no matter what time of the year they were shot.

    Kiki at Walsingham Dog Park - Nikon D300 Nikkor AF-S 105mm VR micro f/2.8G lens @ f/4 ISO 200 1/500thThe green leaves that make up the bokeh of this shot were made to look like autumn colors once again by applying the "Indian Summer" filter in Color Efex Pro 3.  As you can see, Kiki's markings and collar retain their correct colors since none of them included green.

    Layer Mask Photoshop CS5 Digital Photo Editing Lesson with Ed

    Using a layer mask in Photoshop CS5 to change the background of a portrait - book your lesson today to learn tomorrow!

    I met Ed from Jacksonville again this morning for our second of two Photoshop CS5 centered DSLR Photography Lessons.  After giving him a crash course on the basics of using many common Photoshop tools yesterday, today we focused mainly on one thing:  layer masks.  As seen in the image above, if you take a texture, drop it onto a portrait, create a layer mask, then "brush back in" the portrait, you have a very quick and easy way of completely changing the background of a photograph.  You could also keep some of the texture visible over the portrait subject as well to create a different look to the entire frame. 

    This layer mask technique is also very useful for fixing clouds in HDR images, which often turn out too dark.  Using one of my own HDR shots as an example, I showed Ed how you can get the benefit of an HDR image without the drawback (dark clouds) by taking a single frame of the bracketed shots that has very white clouds and using it as a layer mask to blend into the HDR image.  I will be posting this tutorial using the HDR example later this week.

    The four hours (total) I spent showing Ed what I know about Photoshop went by very fast.  We easily could have filled another four.  He took detailed notes so I am confident that with what he learned during our intensive lessons he will be able to apply to his own images and begin teaching himself how to use more features of Photoshop.  

  • Reserve your own 1-on-1 DSLR Photography Lesson (shooting or editing) with Jason today!
  • Learn more about the lessons
  • Browse past lessons with all of my students
  •  

    --Professional Model DSLR Photography Lessons now available!

    Introduction to Photoshop CS5 Basics & Keyboard Shortcuts with Ed

    Grand Tetons photograph by Ed, editing by Jason - the lens correction filter in Photoshop CS5 sets things straight 

    I received a phone call from Ed all the way in Jacksonville (about 3 hours away) asking about taking extended 1-on-1 Photoshop CS5 lessons.  I am not a certified Photoshop expert or anything like that so at first I wanted to make sure he was not looking to learn how to do something like someone's face and put it onto another person's body.  My Photoshop skills lie mostly in the areas that pertain to editing digital photographs, not graphic design.  After talking for a few minutes though I realized that what Ed wanted to learn I could most definitely teach.  We booked two lesson sessions, one for today and another for tomorrow.

    Ed had his own photos to use during the editing lesson and I was pleasantly surprised to see the Grand Tetons.  Florida photographers of course have no local opportunities to photographs mountains of any kind.  Ed's photographs already looked good, but there is almost always something that can be done to improve any photograph, and for sure any published or portfolio photograph by a serious hobbyist or a pro has had at least some editing done to it.  I am not afraid to say that editing is often 50% responsible for the final look of a photograph.  

    The example above did not need that 50% level of editing.  I showed Ed my workflow which starts with cropping (I cropped the photo even more here than I did during the lesson to better show the edits we made) and then removing any dust spots on the sensor that appear as dirt blemishes in the photo by using the healing brush (keyboard shortcut - j).  Then I taught how to use the quick select tool (w) to highlight only the mountains for a contrast adjustment.  Then the foreground grass and fence were selected for a color balance boost.  Lastly, we used unsharp mask to increase the overall sharpness of the image resulting in more defined blades of grass and details in the fence and mountains.  

    Tomorrow we will move on to editing portraits and using layer masks.  

  • Reserve your own 1-on-1 DSLR Photography Lesson (shooting or editing) with Jason today!
  • Learn more about the lessons
  • Browse past lessons with all of my students
  •  

    --Professional Model DSLR Photography Lessons now available!

    The advantage of using HDR processing in photography

    Over the past few years HDR processing has becoming very popular.  A term has even been coined for photographers who first discover HDR then basically only ever make HDR images from then on, "falling into the HDR hole."  It took me a long time to come around to realizing the benefit of HDR because, frankly, all the HDR images I saw online I thought were horrid, and I still personally do not care for a majority of HDR images I see.  This is of course a heated topic in the photography community.  However, for this photography tip, I just want to demonstrate the power HDR has to produce very detailed & dynamic images.


    Many times, using aperture priority mode will result in a very good looking image.  The top photo is the result of setting my Nikon D300 to f/11 in aperture priority mode (A - Nikon, Av - Canon).  Aperture priority produced an ok looking image.  I set my focus point on the middle elbow of the lowest branch using matrix metering mode.  Thus, the priority for the sensor was exposing the tree well.  You can see pretty good detail in all the tree branches, the grass and even the leaves.  However, there is virtually no detail in the sky at all.  Using a single exposure, one has to choose whether to expose for highlights or shadows, and if the highlights are much brighter than the shadows, one of them will have to be sacrificed to a certain degree.  In this case, the sky was sacrificed in order to expose the tree better.

    HDR processing overcomes this by using a series of bracketed shots, some overexposed and some underexposed along with the base image (what aperture priority thinks is best).  For this Gumbo-limbo tree shot, I took 7-bracketed images, of which you can see the brightest (+3 exposure) and the darkest (-3 exposure).  I ommitted the other two exposures for blog post space reasons, but those would just be a little less bright and a little less dark.

    Using Photomatix Pro 3 to combine all seven of those photographs, taking the best exposed parts from each, the final HDR image is able to show the tree in even more detail than the single aperture priority exposure shot and also detail and color in the sky as well.  Therefore, when trying to photography a scene that has a high dynamic range (HDR), taking a bracketed series of shots and combining them into one final HDR image can produce results that no single exposure can.  This is the advantage of HDR processing.

    DSLR Photography Tripod & Editing Lesson with Sarina and her Nikon D90

    Photo by Sarina with editing in Color Efex Pro by Jason - before & after maternity portraitIncreasingly, the DSLR Photography Lessons I teach invovle digital photo editing practice as well.  Each one of Sarina's four lessons have been a split between shooting the first hour and editing the second hour.  If one's goal is to produce pro or as close to pro looking photographs, I cannot stress enough how one must work on shooting and editing skills simultaneously.  In Sarina's photo above, it took shooting skills to setup the strobist portrait and to pose the couple accordling and frame them well on the rocks and include the water.  The exposure is off some and that could have been improved in the field with better settings, but as Sarina realized when you have a client making constant requests, and you are standing in ankle deep water with waves coming in, and you have to keep track of a light stand as well as your camera, it can be a lot to keep track of and missing the exposure by a little bit for a portrait photographer just starting out can be forgiven.  

    So without any digital photo editing skills one would be left with the image on the left.  Nicely composed, but nonetheless flawed.  However, if you do about 4-minutes worth of editing the results, by evidince of the image on the right, can be dramatically improved.  During my photography lessons, if you have Color Efex Pro, I can teach you how to transform your photos like this in minutes.  Sarina will be purchasing the full suite of Nik apps including the aforementioned Color Efex Pro and Silver Efex Pro too, which she tells me is on sale now.  

    Sarina using her Nikon D90 on a tripod to produce a level landscape shot of Tampa BayWe started out the fourth of four lessons by getting in some tripod practice.  The first tip I gave Sarina was to always make sure the front of the lens points out directly over a leg of the tripod (see above).  This adds stability.  One can almost always use the smallest ISO when using a tripod since camera shake is not an issue when having to use a longer exposure to compensate for lack of light.  Plus, using a tripod just slows ones shooting down to a nice pace.  When I use a tripod I really feel like I am crafting a shot much more than one I handhold my Nikon D300.

    I look forward to following Sarina's burgeoning portrait photography career and I think I will see her again in the not too distant future for some more advanced lessons.  

  • Reserve your own 1-on-1 DSLR Photography Lesson with Jason today!
  • Learn more about the lessons
  • Browse past lessons with all of my students
  •  

    --Professional Model DSLR Photography Lessons now available!