editing digital photos

Lamborghini Gallardo Superleggera HDR in black at Tampa International Jet Center

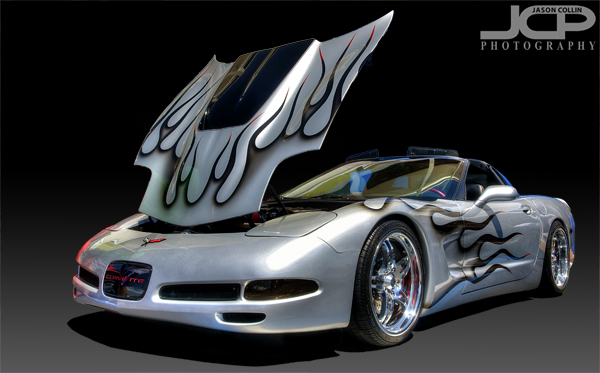
A black Lamborghini Gallardo Superleggera at Tampa International Airport - Nikon D300 Tamron 17-50mm @ f/8 ISO 200 9-exposure HDR tripod mounted with cable releaseThe Lamborghini Gallardo Superleggera is a special version of the Gallardo for high performance on the track.  I believe it is the best looking Gallardo of the many varients.  I had a chance to photograph this Lambo at the Cars & Couture event at Tampa International Jet Center last week.  As is usually the case when photographing cars at events, the background had people and other objects in it distracting from the beautiful Lamborghini itself.  Plus, this was a very black car being sidelit by the setting sun.  To produce the final, fully edited image you see above, it too 1-hour of digital darkroom effort!  This is how editing this digital photograph progressed . . .

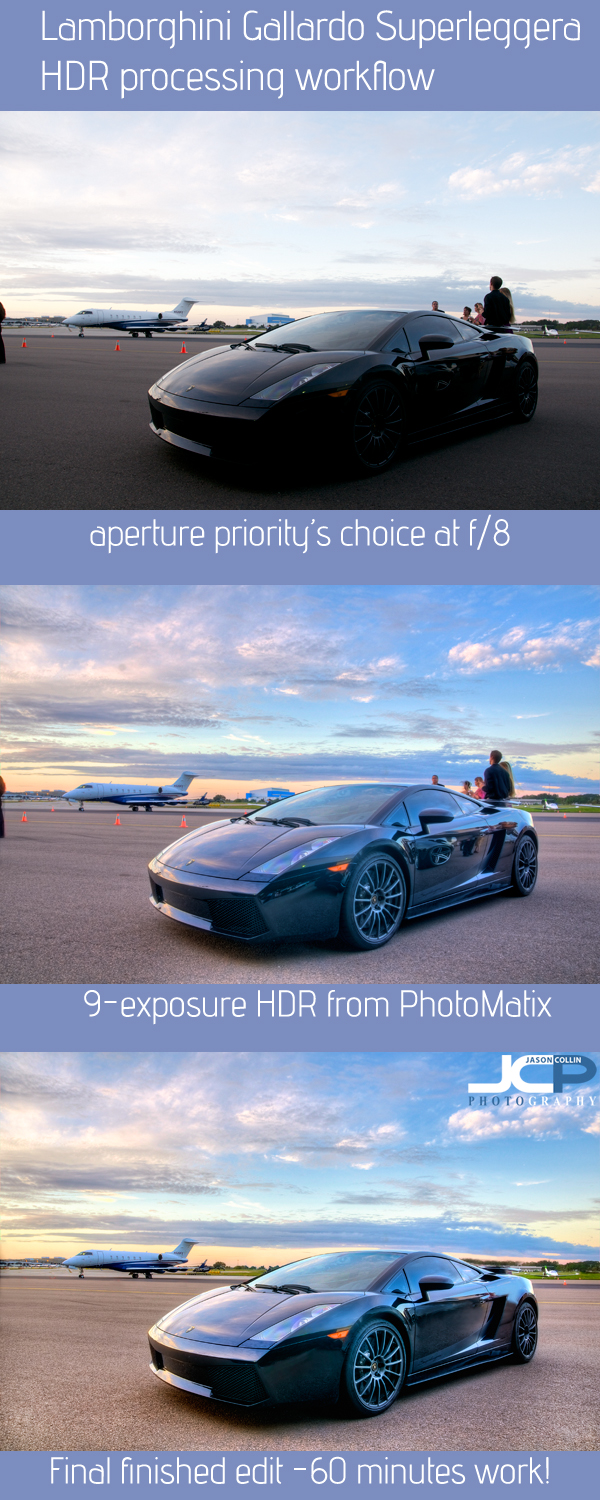
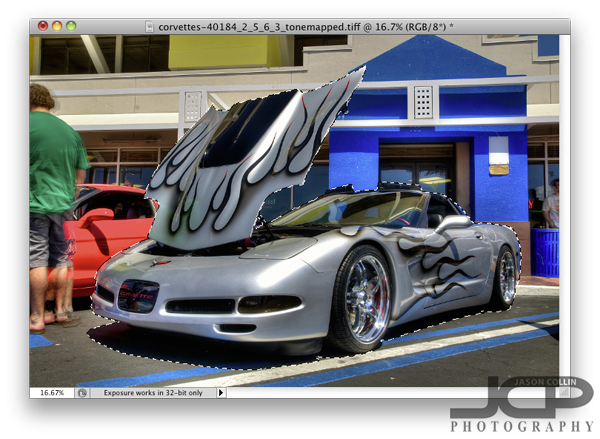
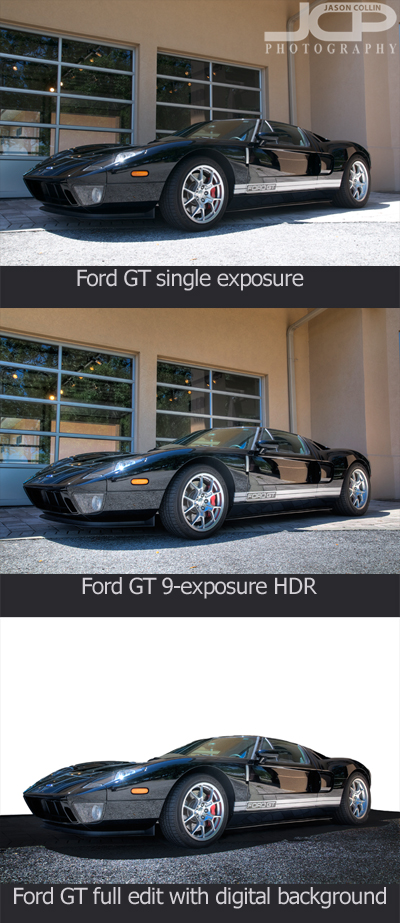
As you can see, if I simply set the exposure mode to aperture priority at f/8 and let the camera's meter make the decision, the result would have been a decent looking sky, but a very underexposed Superleggera that lacked detail in the many shadows.  There was no doubt that I would need to make an HDR image to have a chance at getting both the car and the background looking well exposed.  I went to the max that my Nikon D300 can do, 9-exposures.  

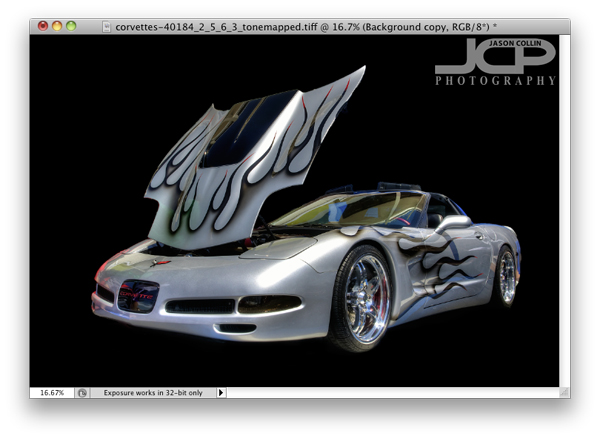
After processing those 9 shots in Photomatix Pro, the middle image was the result.  The worst part of it really were all the reflections in the side of the Lamborghini from another car next to it.  That required a lot of careful clone stamping and even a little painting to get to an at least acceptable level of reflection.  

After that task I set to removing the people standing behind the Superleggera, then the building over the passenger's side, then the cones and finally the person half-visible in the left edge of the frame.  Once the image was all cleaned up I began selectively adjusting contrast levels and doing a little dodging here and there to balance the look of the pavement.

All that is not even counting my initial color correction and adjuting done in Aperture 3 and Color Efex Pro 3!  So you can get an idea of how much work is involved in trying to get a usable car shot from a car event!

Corvette great subject bad background digital photography editing tip

Final fully edited custom silver Corvette - Nikon D300 Tamron 17-50mm @ f/11 ISO 200 5-exposure HDR - black gradient background added digitallyWhat if you have a great subject to photograph, but a terrible background?  I tell my DSLR photography students that assuming you have a good subject, then what makes or breaks a shot, what sets it apart is the light (lighting) and the background.  For this shot the subject is a really cool custom Corvette.  However, the background was horrible and I could not use depth of field techniques to just turn the background into beautiful bokeh because the subject was too close to the background, at least if I wanted to photograph the entire car, which I did.  So, to make the shot usable I opend up my digital photographing editing toolkit.

So what did I do first after processing the HDR image and do a few little minor edits?  I loaded the photo in Photoshop (I still use CS5) and chose the Quick Select (W is the keyboard shortcut) tool.  The background looks very busy and it might seem like selecting the Corvette would be difficult, but there are several factors why it was not too tedious.  One is the Corvette is a fairly distinct, blocky object, no lone thin parts or openings.  Second, none of the surrounding colors are similar to the Corvette itself.  The hood did take a little fine tuning to get selected, but other than that it was not too bad.  Notice I selected the naturally existing shadow under the car too.  Once finished I clicked on the Refine Edge option up in the Quick Select menu bar.

In the Refine Edge window you can clean up the extra bit of edging that you do not want as well as export just the selected subject to a new layer, which is what I always do.  Once that is done, I add a new layer to use as a background that I can paint any color.  I usually choose white first to see how it looks and also to make sure I really cleaned up all the edges.  I liked the white background, so I saved a JPG from the PSD project.

Next I just painted over the white background with the Brush Tool at 100% opacity black.  Right away I liked the black background better as I thought it made the silver Corvette pop out.  The black background caused the shadow to become invisible and kind of made the shot look a little two dimensional, so the final touch was adding a 40% opacity vertical gradient only from the mid-height point of the image.  

This process can of course be used for any subject with a variety of digital or real backgrounds.  So the next time you see a really cool subject, but are disappointed by the background, be sure to still make the shot in the field knowing you can using a few Photoshop techniques to produce a final image you will be happy with.

Ford GT supercar in black Tampa Car Photography

Making the most of an opportunity to photograph a rare Ford GT in Tampa, FloridaWhile on location in Tampa for RM Auctions to photograph a 1974 Jaguar E Type (photos cannot be published until July), at the end of that shoot I had an opportunity to take a few shots of a Ford GT also on site.  This supercar could not be moved and was just parked along side a building with about a third of the car in shade, the other two-thirds in direct afternoon Florida sunlight.  I knew to get any kind of detail and exposure worth having I would need to make it an HDR shot, and I went all the way to the max of 9 exposures that my Nikon D300 does automatically in bracketing mode.  I was for the most part pleased with the results of the HDR process (which does nothing for the reflections in the paint, unfortunately), but still did not like the foreground nor the background.  To get the foreground like the above I Quick Selected it in Photoshop CS5 and burned and underexposed it, also cloning out a few stray pieces of debris.  I repeated that process for the background and just painted it completely white.

In the above sequence you can see the difference HDR makes and then how cleaning up the foreground and eliminating the background puts the focus on the car itself.  Now about the reflections in the car, there is nothing I can do about those.  Small reflections can be cleaned up, but entire body panels cannot.  Still, I am happy with the results and glad to have the chance to photograph a Ford GT, a car made famous recently by Jeremy Clarkson of Top Gear who purchased one himself.

Removing the photograph background but preserving foreground details for depth

In an attempt to further refine my own skills with using the "Refine Edge" function in Photoshop's Quick Select tool I made the above photograph of Kiki right here in the living room.  I knew beforehand I would be removing the background and painting in a new one.  I have really started to like using this technique lately, especially when adding a pure white background.  However, when including a full view of the subject, replacing the entire background be it with all white or any other color a lack of depth can result as the foreground and background are exactly the same.  As you can see in the finished version on the right some shadow and light remain on the floor around Kiki's paws.  After doing my usual edits to the image, the process I followed for making the digital backround was thus: 

  • Quick Select the floor area only & increase its contrast
  • Using the Eye Dropper tool select a color from the increased contrast floor (gray-ish in this case)
  • Increase the area Quick Selected to included everything except Kiki herself
  • Using the Brush tool at 100% paint the background up until the edge of the floor
  • Change the opacity to 40% and paint the floor area until a uniform gradient appears 

In am happy with the process I used to make the digital background in this case, but I would like to improve the smoothness of the gradient/transition of the background to foreground even more by using every smaller opacities to brush it in.

The finished final image of Kiki with gray background added in Photoshop leaving floor light and shadow for depthAlas there is no editing I can do to make Kiki not look like a sad puppy.  This was right before our usual dog park time and I think she was wondering why do I have to sit through this when we could already be on our way to the park!  Next time I will attempt her portrait in the morning.

Get images like these of your dog or cat or pet done right in your own living room . . . contact Jason today to reserve your shoot!

Aperture 3 Workflow Digital Photography Lesson on MacBook Pro St. Petersburg Florida

Bill learning my Aperture 3 workflow right from my desk also getting emotional support from Kiki!Last week Bill came over to my apartment for a digital photography workflow lesson based on Aperture 3.  This was my sixth time meeting up with Bill, but the first to focus on the part of digital photography that happens after you return from shooting, which is just as important as learning how to shoot out in the field.  Once you start taking 200, 300, 400+ photos on any given outing with your DSLR then workflow and photo management becomes critical in making sure you showcase your best images and can find them one year down the road.  

After Kiki gave Bill an enthusiastic greeting, we opened up our MacBook Pros at my desk and I went step-by-step with Bill first getting my preferred Aperture 3 settings into his version, and then showing him what you do once you insert a memory card into the SD slot on the side.  Upon photo import in Aperture 3 you can imprint a lot of very useful metadata, as well as rename the files (so all your shots are not _DCC457) and put them into a new project to start off your workflow with good orginization.

Bill had photos from his daughter's prom night pre-dance getogether at his own home for us to use.  I showed him my culling process for picking the best shot out of 3-4 similar shots.  This involves a star-rating system and then a side-by-side full-screen comparison of shots.  We finished the lesson with using some of the handy sliders and brushes in Aperture 3 to make the first round of edits on a given digital photograph.  

Model headshot edit inspired by Jem the cartoon series

This editing style was inspired by the Jem cartoon series! -- Model: AbbyI was going through Netflix's always woeful list of new releases when I saw that the cartoon series Jem was now available.  I remember watching this cartoon in the 80s because of the vivid pastel colors and style of the animation.  So this afternoon I went about converting one of my own photographs into a Jem-style image.

The above is my final image next to a photo of Jem (source Wikipedia).  Maybe long before I saw Jem in Netflix I had a subconscious thought to convert the shot of model Abby into a Jem-style one as I did not really like how I originally shot the photo, but I kept it lying around for some reason.  

The first thing I did was to load the original image (see above) into Photoshop CS5.  Well, actually before that I did some slight warming to the image in Aperture 3 via Nik Color Efex Pro 3.

In Photoshop using the Quick Select Tool (W) I selected only the background of the image.  I did then click on Refine Edge to make the border along the hair look more natural and less choppy.

The next step was the key one and really how I thought I would go about making the photograph look more Jem-like and I knew how to do it entirely because of making mistakes in the past with my keyboard shortcut usage.  I always use CMD-SHIFT-I to resize images before I post them on this site and Facebook, etc.  Sometimes I end up hitting just CMD-I which is the Invert command in Photoshop.  Since only the background was selected, only the background became inverted going from black to white and the bokeh from yellow to purple, which to me is much more Jem-like!

Next to clean up the image and make the model look more like Jem does, I used the Clone Stamp Tool (S) at 40% opacity and just sampled an area then brushed over that same area repeating as skin tone and texture changed for each part of the face.  This is the quickest and easiest way I know of for smoothing skin.  Note, I did not say it was the best, just the quickest and easiest.

To further the smooth and glowing look that Jem has, I used a free Photoshop action available here.  That completed the look.  I did not intend to tightly crop the image, but after all editing was done I thought a tighter crop was a better way to feature the image.  I just hit C in Photoshop to bring up the Crop Tool.  

Try this Jem-style process out on one of your photographs and post a link to the results in the comments below!

Aperture 3 & Photoshop CS5 Digital Photography Editing lesson with Kamila

Editing one of Kamila's baby portraits using Aperture 3 and Photoshop CS5 - this photo made by iPhone 4It has been almost a year now since I met Kamila for our first 1-on-1 DSLR Photography Lesson in downtown St. Petersburg.  It has been good to see her increase her photography shooting skills.  As such, our last two lessons have focused on editing digital photos.  Since that last editing lesson she has also greatly upgraded her workstation with a 27" iMac!  As I recommended she got Aperture 3 to use as her photo management system and initial editing app.  We began the lesson with getting her RAW workflow as streamlined as mine is on Aperture 3, which mainly involved getting the import presets & meta data all set up.  

From there I showed her my usual first editing steps in Aperture 3:  straightening, cropping, and exposure tweaks, all only if necessary.  We set up Photoshop CS5 to be the external editor for photos in the Aperture 3 library allowing us to actually work in Photoshop, but still all saves change the file within Aperture 3.

I am a big proponent of keyboard shortcuts, and before the lesson I sent Kamila my PDF of Aperture 3 and Photoshop most used keyboard shortcuts (get it here yourself!).  Kamila took further handwritten notes to try and remember as much as I could teach her in our 2-hour lesson.  I am confident that Kamila will get faster and faster at editing using the tips I gave her today and as she memorizes more of the keyboard shortcuts.  For our next lesson we will move on to more advanced editing including selective edits, object extraction and lens distortion correction.