Photoshop

Photography Tip - make your own bokeh using Photoshop Gaussian Blur

If you have a photograph that you wish had a bokeh (out of focus) background, you can still add one in Photoshop using the Gaussian Blur filter.  This can be an easy way to add a whole new look to a photo.  In the above example of mother and daughter sunset beach portrait, I chose to have the background in detail by using a small aperture and wide focal length.  I like the shot as it is, but I was curious to see how it would look with the background out of focus (bokeh).  The following describes my digital workflow:

  • Use the Quick Select tool to select just the mother and daughter (foreground subject)
  • Choose the Inverse of the selection
  • Apply the Gaussian Blur filter 

In this case, it was a pretty simple process.  I chose to select the people rather than the sky, then do the inverse because I felt that was a simpler selection to make.  For other photographs, you may want to select the background itself if that is easier.  Then you also do not have to select the Inverse of the selection.  

Let me know in the comments below how this bokeh photography tip worked for you.

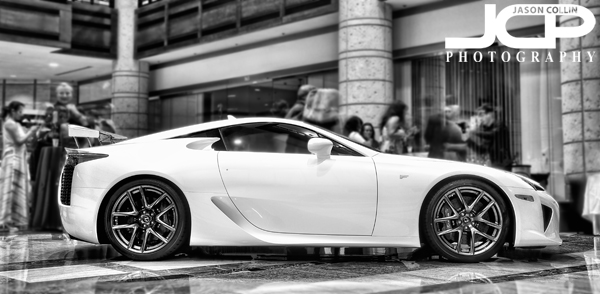
Lexus LFA #406 in St. Petersburg Florida Grand Prix Gala

Lexus LFA #406 in St. Petersburg Florida - Nikon D300 Tamron 17-50mm @ f/8 ISO 200 7-exposure HDR - see editing workflow for this shot belowI first saw this white Lexus LFA #406 at the Cars & Couture Tampa event last year, but it was roped off making it impossible to get any kind of usuable shot at that event.  Lucky for me it was shown again at the 2013 St. Petersburg Grand Prix Gala this time with no ropes.  Still, it was in the middle of a building lobby surrounded by people so to get usable shots I liked I had to be pretty creative with editing.  

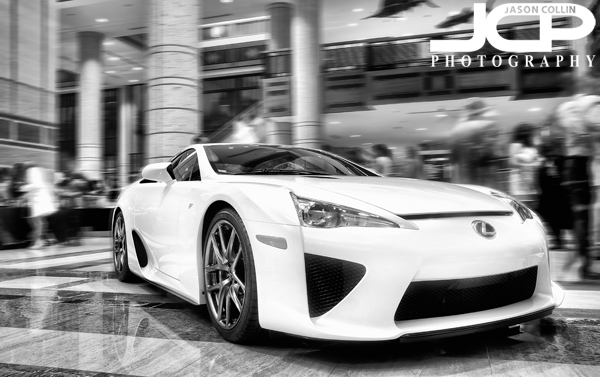
Lexus LFA #406 St. Petersburg Florida car photography with added motion blur HDR image - Nikon D300 Tamron 17-50mm @ f/8 ISO 200 7-exposure HDRUsually I have an idea of where I want to end up before I start editing a shot, or even before I push the shutter out in the field making the photograph in the first place.  This time I did not anticipate liking B&W better, nor adding digital blur (both Guassian and motion) to the shots.

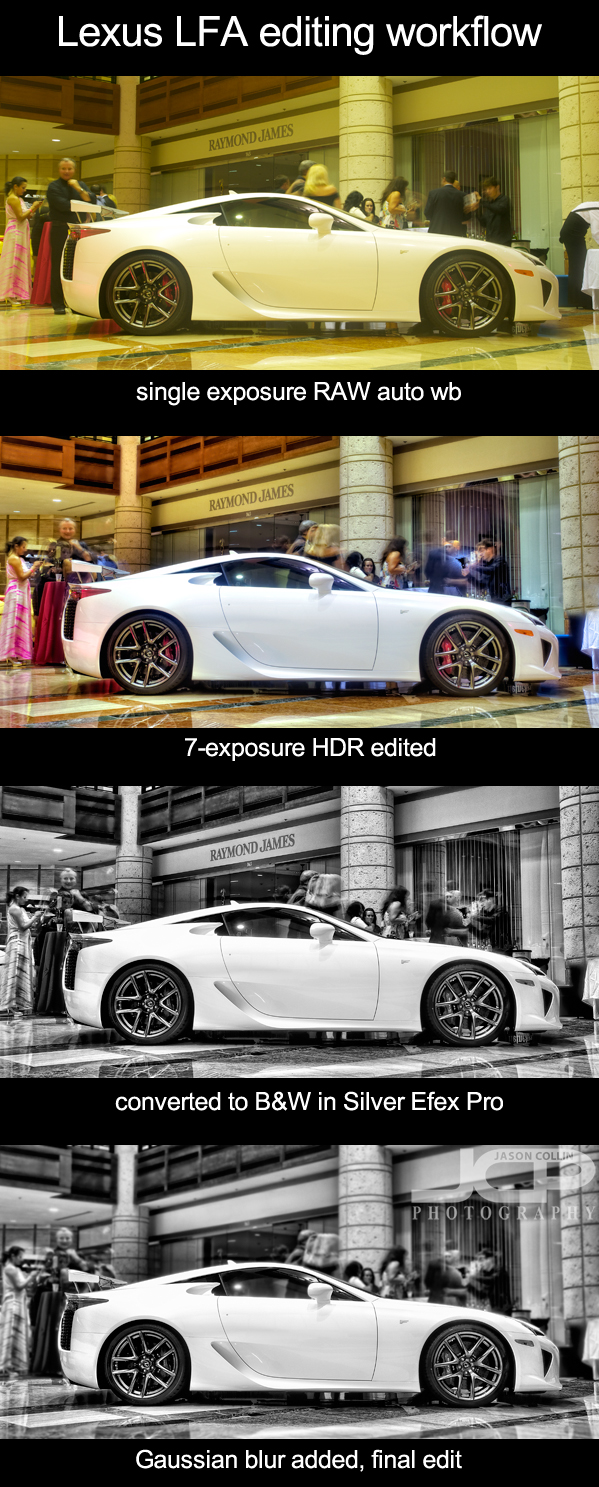
Lexus LFA #406 at the St. Petersburg Florida Grand Prix Gala 2013 - Nikon D300 Tamron 17-50mm @ f/8 ISO 200 7-exposure HDREvery shot was made from a 7-exposure HDR image and required a lot of color correction.  Shooting in RAW and auto white balance normally produces a very color accurate shot once in Aperture 3.  Not so this time as even after Aperture did its thinking on processing the RAW image it remained very yellow.  I heard people with point and shoot cameras complaining how yellow their shots were coming out too.  Standing in the space I did not notice that much warm lighting so I was surprised the RAW shot needed as much work as it did.  Below I show in four abbreviated steps my digital editing workflow starting with a single RAW file and ending with the final look I chose for the shot.  In all this initial workflow took about 45-minutes to finalize.  It was then faster to apply it to the other two images in this post since I knew what I wanted. 

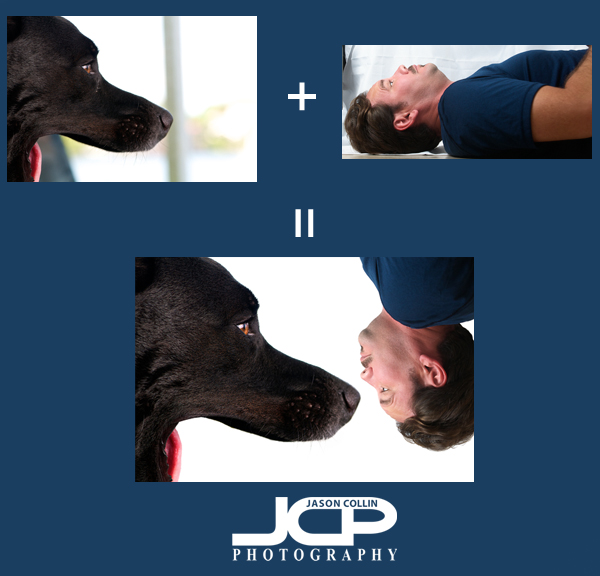
Unique Pet Photography - Kiki & Jason out of perspective

How can you make a unique photograph?  How can you push the bounds of what a photograph can be?  A single exposure, a single shot, that can create a great pet photograph no doubt.  However, it is limiting in just how unique a shot can be.  I am always thinking of ways to make unique and interesting pet photography shots, and photographs in general.  In the above composite photograph of me and my beloved puppy Kiki, I took a shot I made of Kiki over a year ago and combined it with a self-portrait I just made this afternoon.  Below is how I did it:

I already had the shot of Kiki edited onto a white background.  The original photo was mostly white in the background, but I still used the Quick Select Tool in Photoshop to cut Kiki out of it and then paint in a digital background.  I have that photo printed out and on a shelf in my bedroom so I see it every day.  It popped into my head recently to put myself into that image to make it appear that Kiki was about to swallow me.  There was not enough space under her upper jaw for me to really be seen, so instead I used a flipped self-portrait in a perspective showing me to be actually smaller than Kiki, adding to the uniqueness and strangeness of the final composite image.

Photography Tip use Unsharp Mask for sharpening in Photoshop

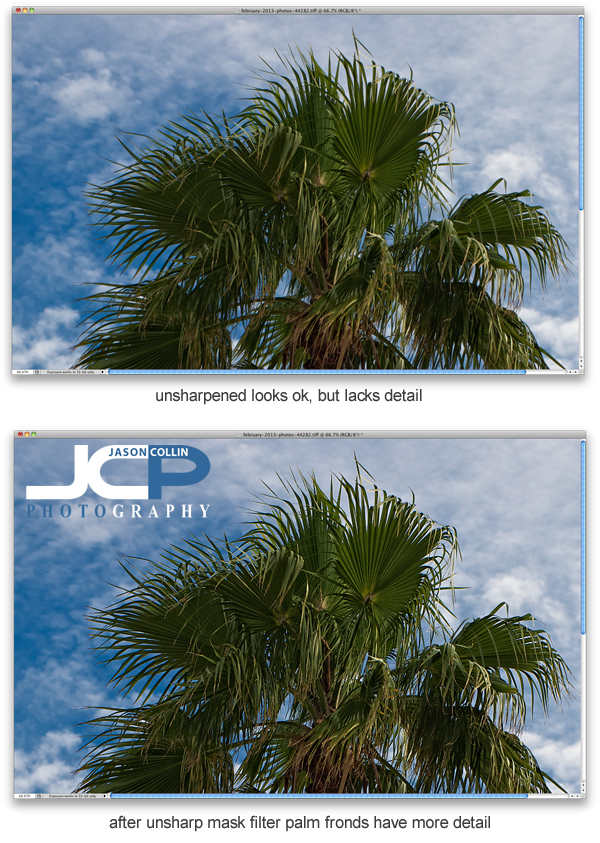
Sharpening is a key part of editing digital photos and perhaps one that goes overlooked due to thinking sharpening is not needed.  On every shot I edit, I use the Unsharp Mask filter in Photoshop (I still use CS5).  In the above example of a cabbage palm tree, I did all my usual editing except sharpening.  The unsharpened image may look fine, but I know it can look better.  In the sharpened version much more detail is visible in the palm fronds, especially on the edges.  Another photography tip within a tip, I did all other editing first because sharpening should be the last thing done when editing an image.

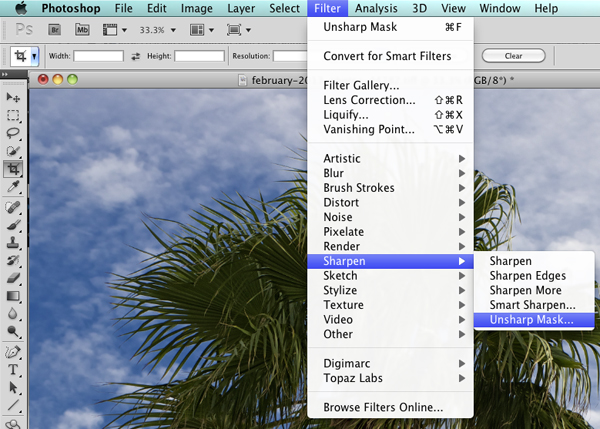
To find Unsharp Mask in Photoshop go into the Filter menu, then Sharpen, and there you will find Unsharp Mask.  I kow it sounds totally crazy to use something called unsharpen to sharpen, but that is just one of the thousands of quirks you either find charming about Photoshop or infuriating!  Note that if you used Unsharp Mask already, on a Mac you can just hit CMD-F to apply the same sharpening to the current photo you are working on.

You can see the settings I use in the Unsharp Mask filter in the above screenshot.  Radius and Threshold never change and are at settings I found I liked, though I learned these from another photographer and fine tuned them a bit.  The only setting of the three I change when applying the Unsharp Mask filter is the Amount percent.  For a very large majority of my photographs, I use 60%.  For portraits (single subject) I may use less.  For HDR shots, I may use more.  Each camera and lens may dictate more or less sharpening to be used.  

Try out the Unsharp Mask filter and let me know what you think in the comments below!

St. Petersburg Florida downtown harbor panorama fine art photograph

Click for 1200px version - St. Petersburg downtown harbor panorama fine art photograph - Nikon D300 Tamron 17-50mm @ f/11 ISO 200 1/400th 4-shot panorama 

If you have Photoshop CS5 or CS6 it is amazingly easy to make a panorama image.  The above panorama of the downtown St. Petersburg, Florida harbor is composed of four shots that I made handheld using only the gridlines in my viewfinder to line up.  Then I loaded those four shots into Photoshop's Photomerge action, led the CPU do a lot of processing, and voila, out came a panorama that I then proceeded to do my usual editing workflow on.  

I am often with my camera near this small harbor as I use this location when teaching my 1-on-1 DSLR Photography Lessons.  It is a very good spot to practice making panorama images, composing with leading lines, S-curves and sometimes even wildlife.

Corvette great subject bad background digital photography editing tip

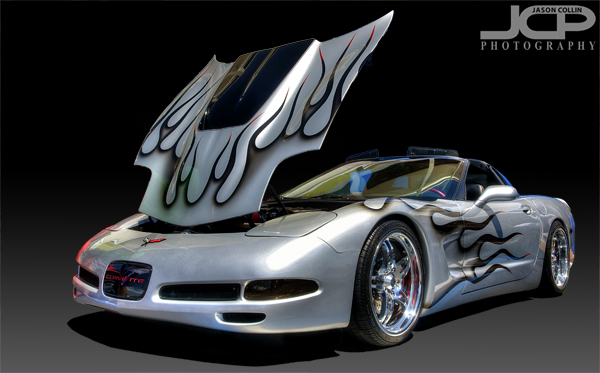
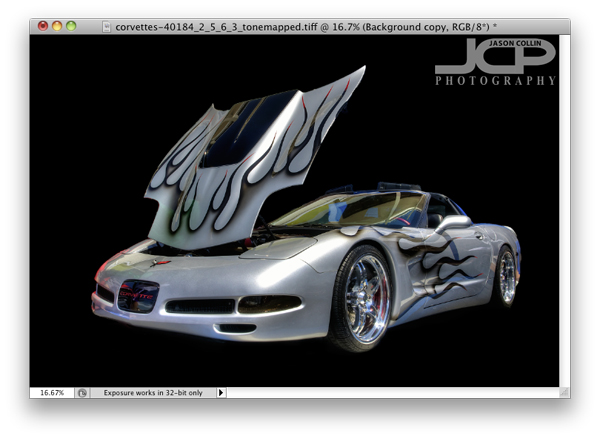
Final fully edited custom silver Corvette - Nikon D300 Tamron 17-50mm @ f/11 ISO 200 5-exposure HDR - black gradient background added digitallyWhat if you have a great subject to photograph, but a terrible background?  I tell my DSLR photography students that assuming you have a good subject, then what makes or breaks a shot, what sets it apart is the light (lighting) and the background.  For this shot the subject is a really cool custom Corvette.  However, the background was horrible and I could not use depth of field techniques to just turn the background into beautiful bokeh because the subject was too close to the background, at least if I wanted to photograph the entire car, which I did.  So, to make the shot usable I opend up my digital photographing editing toolkit.

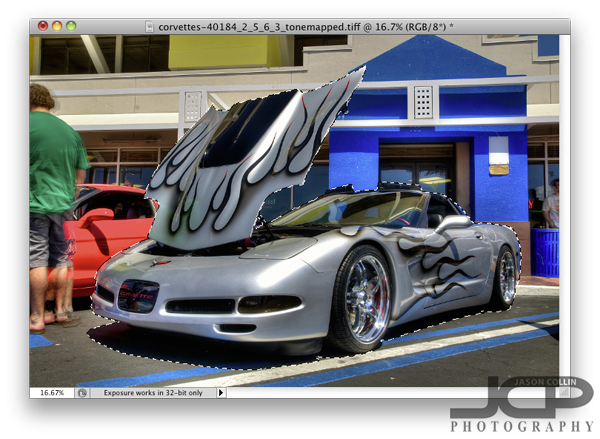
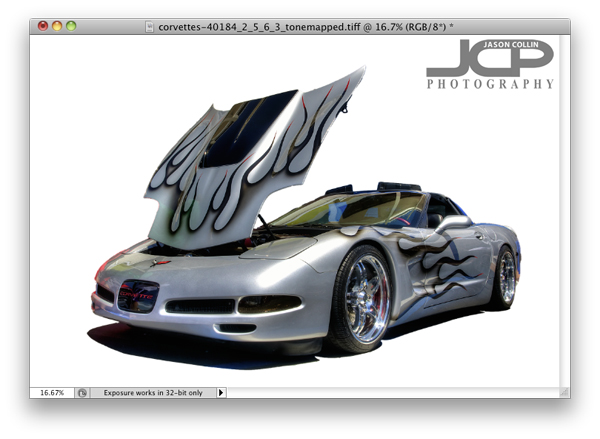
So what did I do first after processing the HDR image and do a few little minor edits?  I loaded the photo in Photoshop (I still use CS5) and chose the Quick Select (W is the keyboard shortcut) tool.  The background looks very busy and it might seem like selecting the Corvette would be difficult, but there are several factors why it was not too tedious.  One is the Corvette is a fairly distinct, blocky object, no lone thin parts or openings.  Second, none of the surrounding colors are similar to the Corvette itself.  The hood did take a little fine tuning to get selected, but other than that it was not too bad.  Notice I selected the naturally existing shadow under the car too.  Once finished I clicked on the Refine Edge option up in the Quick Select menu bar.

In the Refine Edge window you can clean up the extra bit of edging that you do not want as well as export just the selected subject to a new layer, which is what I always do.  Once that is done, I add a new layer to use as a background that I can paint any color.  I usually choose white first to see how it looks and also to make sure I really cleaned up all the edges.  I liked the white background, so I saved a JPG from the PSD project.

Next I just painted over the white background with the Brush Tool at 100% opacity black.  Right away I liked the black background better as I thought it made the silver Corvette pop out.  The black background caused the shadow to become invisible and kind of made the shot look a little two dimensional, so the final touch was adding a 40% opacity vertical gradient only from the mid-height point of the image.  

This process can of course be used for any subject with a variety of digital or real backgrounds.  So the next time you see a really cool subject, but are disappointed by the background, be sure to still make the shot in the field knowing you can using a few Photoshop techniques to produce a final image you will be happy with.

Thunderstorm approaching St. Petersburg Stormy Sky

Click image for larger 2000px version - 4-shot panorama stitched together in Photoshop CS5This is almost a real-time weather report panorama image as just a few minutes ago this massive thunderstorm was approaching St. Petersburg, Florida from the east.  In the time it took me to stitch it together and edit it in Photoshop it has began its pouring of a deluge of rain and striking of thunderbolts.  The rain is much needed here and hopefully the storm will pass quickly so Kiki and I can still go to the dog park as usual in the evening and I can play in the weekly ultimate frisbee pickup game even later in the evening!

Making a panorama image like this is not difficult in Photoshop CS5.  Using an 80-200mm lens, setting my exposure in manual mode, then locking in the focus, I took the four shots handheld using the gridlines in my Nikon D300's viewfinder to lineup the overlap needed between each shot.  Then using the Photomerge feature in CS5 it was just a matter of choosing spherical in the settings and letting my MacBook Pro's CPU do the heavy lifting.