editing digital photos

Orange Lamborghini Gallardo Superleggera HDR St. Petersburg Florida car photography

An orange Lamborghini Superleggera on digital black background photographed in St. Petersburg Florida - Nikon D300 Tamron 17-50mm @ f/11 ISO 200 7-exposure HDRMy favorite Lamborghini is the Lamborghini Gallardo Superleggera because of why and how it was made (super lightweight to be the best driver's car possible).  At the Festivals of Speed Concours d'Elegance 2013 in St. Petersburg Florida I had the opportunity to photograph this orange Superleggera.  As is often the case with shooting at car shows, the background was less than ideal.

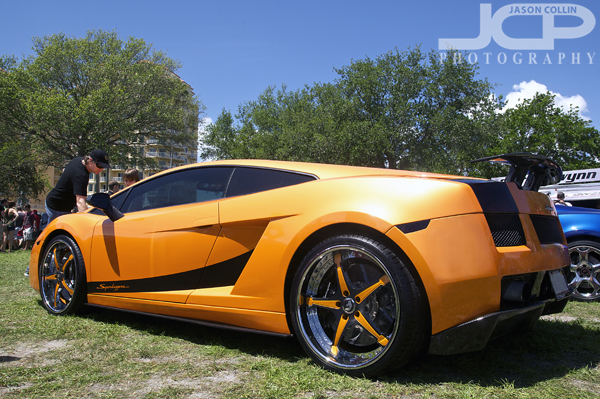
Original HDR image of this Lamborghini Superleggera at the Festivals of Speed St. Petersburg Florida 2013I had this in mind when looking for the best angle to photograph the Lamborghini.  I knew the background did not matter, I would edit it out.  What I looked for was minimal reflections in the car body.  To my surprise there were almost none the entire length of the driver's side, hence I setup my tripod to shoot it from this angle.  Choosing a black background also hid any imperfections in carrying over the shadow under the car.

Chrome Nissan GT-R at Festivals of Speed 2013 St. Petersburg Florida Car Event Photography

Chromed Nissan GT-R at the Festivals of Speed 2013 event in St. Petersburg Florida, highly stylized & editedAt the Festivals of Speed 2013 car event in St. Petersburg, Florida, there was no shortage of cars getting a lot of attention.  However, a chrome Nissan GT-R was getting more than most.  Anytime you chrome out a car, it is going to be eye catching.  Whether such a finish to a car is to your taste or not, you cannot help but stare at it.  Since this GT-R was surrounded by people, I had to do a lot of editing in Photoshop and other apps to get a final result I liked.  Below I show the process.

I chose to completely replace the sky because that was much, much easier to do than to edit out the people and trees in the existing background.  This way I only had to select the car and foreground and then place that on a new layer and slip in behind it a blue sky I had in my archives.  The choice to go infrared was because of how black it made the sky, and in contrast how shiny the car looked in comparison.  Editing out the reflections in the car was just a tedious process that needed to be done to complete the look.

Photography Tip - make your own bokeh using Photoshop Gaussian Blur

If you have a photograph that you wish had a bokeh (out of focus) background, you can still add one in Photoshop using the Gaussian Blur filter.  This can be an easy way to add a whole new look to a photo.  In the above example of mother and daughter sunset beach portrait, I chose to have the background in detail by using a small aperture and wide focal length.  I like the shot as it is, but I was curious to see how it would look with the background out of focus (bokeh).  The following describes my digital workflow:

  • Use the Quick Select tool to select just the mother and daughter (foreground subject)
  • Choose the Inverse of the selection
  • Apply the Gaussian Blur filter 

In this case, it was a pretty simple process.  I chose to select the people rather than the sky, then do the inverse because I felt that was a simpler selection to make.  For other photographs, you may want to select the background itself if that is easier.  Then you also do not have to select the Inverse of the selection.  

Let me know in the comments below how this bokeh photography tip worked for you.

Lexus LFA #406 in St. Petersburg Florida Grand Prix Gala

Lexus LFA #406 in St. Petersburg Florida - Nikon D300 Tamron 17-50mm @ f/8 ISO 200 7-exposure HDR - see editing workflow for this shot belowI first saw this white Lexus LFA #406 at the Cars & Couture Tampa event last year, but it was roped off making it impossible to get any kind of usuable shot at that event.  Lucky for me it was shown again at the 2013 St. Petersburg Grand Prix Gala this time with no ropes.  Still, it was in the middle of a building lobby surrounded by people so to get usable shots I liked I had to be pretty creative with editing.  

Lexus LFA #406 St. Petersburg Florida car photography with added motion blur HDR image - Nikon D300 Tamron 17-50mm @ f/8 ISO 200 7-exposure HDRUsually I have an idea of where I want to end up before I start editing a shot, or even before I push the shutter out in the field making the photograph in the first place.  This time I did not anticipate liking B&W better, nor adding digital blur (both Guassian and motion) to the shots.

Lexus LFA #406 at the St. Petersburg Florida Grand Prix Gala 2013 - Nikon D300 Tamron 17-50mm @ f/8 ISO 200 7-exposure HDREvery shot was made from a 7-exposure HDR image and required a lot of color correction.  Shooting in RAW and auto white balance normally produces a very color accurate shot once in Aperture 3.  Not so this time as even after Aperture did its thinking on processing the RAW image it remained very yellow.  I heard people with point and shoot cameras complaining how yellow their shots were coming out too.  Standing in the space I did not notice that much warm lighting so I was surprised the RAW shot needed as much work as it did.  Below I show in four abbreviated steps my digital editing workflow starting with a single RAW file and ending with the final look I chose for the shot.  In all this initial workflow took about 45-minutes to finalize.  It was then faster to apply it to the other two images in this post since I knew what I wanted. 

Unique Pet Photography - Kiki & Jason out of perspective

How can you make a unique photograph?  How can you push the bounds of what a photograph can be?  A single exposure, a single shot, that can create a great pet photograph no doubt.  However, it is limiting in just how unique a shot can be.  I am always thinking of ways to make unique and interesting pet photography shots, and photographs in general.  In the above composite photograph of me and my beloved puppy Kiki, I took a shot I made of Kiki over a year ago and combined it with a self-portrait I just made this afternoon.  Below is how I did it:

I already had the shot of Kiki edited onto a white background.  The original photo was mostly white in the background, but I still used the Quick Select Tool in Photoshop to cut Kiki out of it and then paint in a digital background.  I have that photo printed out and on a shelf in my bedroom so I see it every day.  It popped into my head recently to put myself into that image to make it appear that Kiki was about to swallow me.  There was not enough space under her upper jaw for me to really be seen, so instead I used a flipped self-portrait in a perspective showing me to be actually smaller than Kiki, adding to the uniqueness and strangeness of the final composite image.

Photography Tip use Unsharp Mask for sharpening in Photoshop

Sharpening is a key part of editing digital photos and perhaps one that goes overlooked due to thinking sharpening is not needed.  On every shot I edit, I use the Unsharp Mask filter in Photoshop (I still use CS5).  In the above example of a cabbage palm tree, I did all my usual editing except sharpening.  The unsharpened image may look fine, but I know it can look better.  In the sharpened version much more detail is visible in the palm fronds, especially on the edges.  Another photography tip within a tip, I did all other editing first because sharpening should be the last thing done when editing an image.

To find Unsharp Mask in Photoshop go into the Filter menu, then Sharpen, and there you will find Unsharp Mask.  I kow it sounds totally crazy to use something called unsharpen to sharpen, but that is just one of the thousands of quirks you either find charming about Photoshop or infuriating!  Note that if you used Unsharp Mask already, on a Mac you can just hit CMD-F to apply the same sharpening to the current photo you are working on.

You can see the settings I use in the Unsharp Mask filter in the above screenshot.  Radius and Threshold never change and are at settings I found I liked, though I learned these from another photographer and fine tuned them a bit.  The only setting of the three I change when applying the Unsharp Mask filter is the Amount percent.  For a very large majority of my photographs, I use 60%.  For portraits (single subject) I may use less.  For HDR shots, I may use more.  Each camera and lens may dictate more or less sharpening to be used.  

Try out the Unsharp Mask filter and let me know what you think in the comments below!

Audi R8 HDR highly stylized black & white image Florida custom car photography

"Essence of the Audi R8"

I photographed this Audi R8 at the Cars & Couture event at Tampa International Jet Center.  There was very limited space to get any shot and from no angle was there any kind of clean background.  The rear three-quarters view I felt was the best composition given the constraints knowing that I would ultimately remove the car from its real surroundings.  The following is the digital editing process I went through in making the final image you see above which I feel shows the essence of the Audi R8.

I initially thought I could keep the existing cement floor background only making the upper half of the image a digital white background.  However, I was not happy with the lack of consistency in how the floor looked from left to right as well as having no good natural cut off point for it.  I never actually removed the floor from the background.  Through several editing steps it became lightened and smoothed out.  The silhouette filter in Silver Efex Pro essentially made it disappear, but critically leaving the natural shadows under the R8.  Although much of the body of the R8 was also lost in appying this filter, I liked that.  The remaining view of the car, basically all the black trim including the unique "blade" air intake and the black wheels, still showed enough for a knowledgeable viewer to know it was an Audi R8.