

What is the final step in editing digital photos that you will display online? Resizing. This is a very simple thing to do, but very important for presenting your photographs online in the best possible quality. Just uploading full resolution images is very rarely the way to go for a number of reasons. One is that it takes up a lot of space and many websites do not allow large file uploads. Secondly, who knows what kind of recompression and resizing websites use in presenting your images. This is why every single image you see of mine online has been exactly resized in Photoshop to the best possible size for the location it is displayed on.
In the above screenshot you can see the Photoshop Image Size dialogue box. The Mac keyboard shortcut to get to it is: OPTION-CMD-I or you can go into the menus: Image --> Image Size. I use pixel count to resize my images. Every image in the blog section of my website (you are looking at it now) is resized to 600px on the width maximum because that is what fits within the body portion of the blog page. Photoshop will keep the height in proportion automaticaly when I type in 600px for the width, see it chose 399px for the height in the above example.
There is no loss in image quality when resizing in Photoshop, which is why I use it for all my images. If I just let Squarespace (my content management system) resize a much larger image for me, that will eat up my alloted storage space much quicker and worse, may not display my photographs in maximum quality. There could be pixelating resulting from poor resizing.
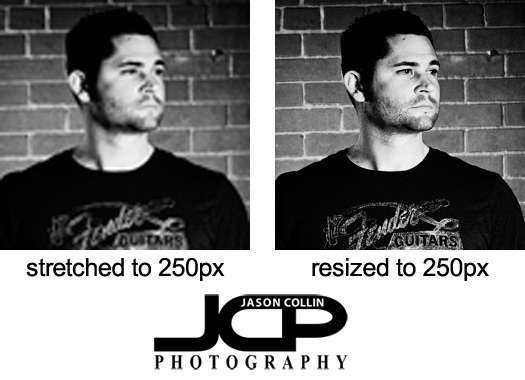
In the headshot example above, each one is 250px on the width. The image on the left shows what can happen if a smaller image is stretched to a larger size. A lot of detail in the image is lost. The headshot on the right was resized from the original photograph to exactly 250px and looks like the full resolution image in detail and quality. The same poor image quality can result if you upload a huge image then compact it into a much smaller space. This has happened with past headshot clients actually. Most website profile photos are only about 200px on the width, which is the case for popular networking site Linkedin. So when the client uploads their full resolution headshot (2000px or larger) and Linkedin tries to squeeze that into just 200px worth of space, the image will look horrible. In the case the client did not have resizing skills, I sent them a 200px version of their headshot.

Facebook is a photograph displaying disaster. They remain the only site that degrades image quality that I know of. It is preposterous that they do it when no other photo intensive site does. Still, it is an important place for me to show my work so I do upload my photos to it. Even though I resize my images in Photoshop to Facebook's exact required dimensions, their resampling engines go to work on my images reducing their image quality.
Since adding the feature to display a cover image to a Facebook profile, I have seen an increase in strangely sized and proportioned images on Facebook. The exact dimension required is 851x315. Nice even numbers you can remember easily right?
So how can you resize your photo to fit a Facebook Cover image space and minimize the image quality reduction Facebook will apply to the image anyway? Load the image in Photoshop, choose the Crop Tool, and enter in the pixel dimensions of 851x315. Select the area of the photograph. Since 851x315 is a strange proportion, you will almost never be able to fit your whole photo in that area. Once you crop the image to the right ratio, you still have to resize it. Then go into Image Size as described above and type in 851 for the width. Now you can upload a photo that will fit perfectly into the Facebook cover image spot, but you will notice the quality reduction applied despite this.