Photoshop

Ford GT supercar in black Tampa Car Photography

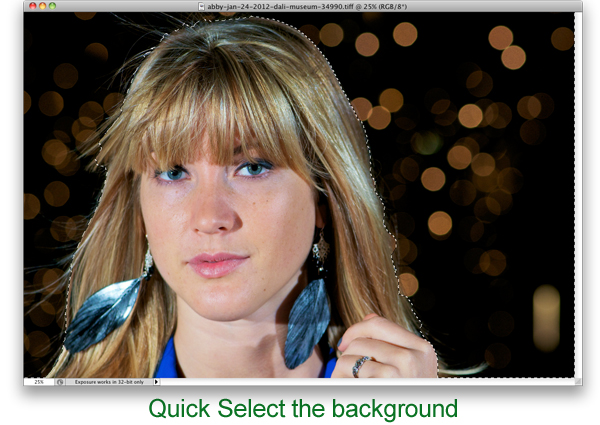
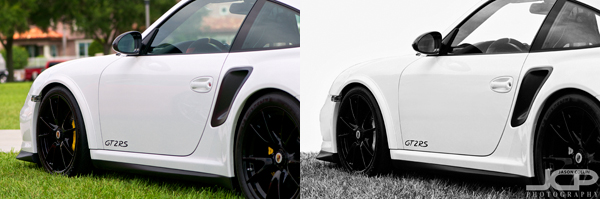
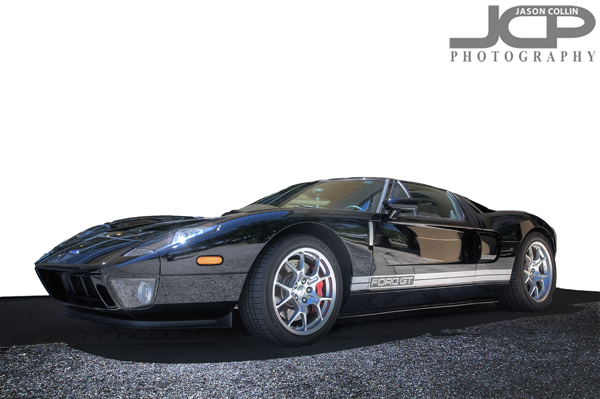
Making the most of an opportunity to photograph a rare Ford GT in Tampa, FloridaWhile on location in Tampa for RM Auctions to photograph a 1974 Jaguar E Type (photos cannot be published until July), at the end of that shoot I had an opportunity to take a few shots of a Ford GT also on site.  This supercar could not be moved and was just parked along side a building with about a third of the car in shade, the other two-thirds in direct afternoon Florida sunlight.  I knew to get any kind of detail and exposure worth having I would need to make it an HDR shot, and I went all the way to the max of 9 exposures that my Nikon D300 does automatically in bracketing mode.  I was for the most part pleased with the results of the HDR process (which does nothing for the reflections in the paint, unfortunately), but still did not like the foreground nor the background.  To get the foreground like the above I Quick Selected it in Photoshop CS5 and burned and underexposed it, also cloning out a few stray pieces of debris.  I repeated that process for the background and just painted it completely white.

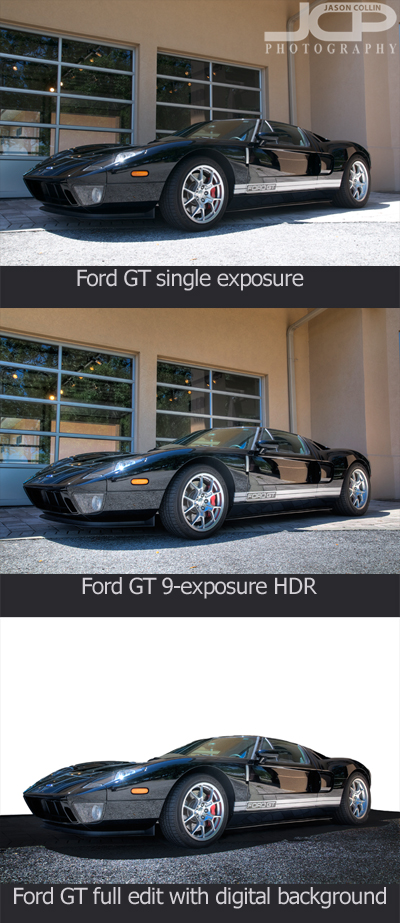
In the above sequence you can see the difference HDR makes and then how cleaning up the foreground and eliminating the background puts the focus on the car itself.  Now about the reflections in the car, there is nothing I can do about those.  Small reflections can be cleaned up, but entire body panels cannot.  Still, I am happy with the results and glad to have the chance to photograph a Ford GT, a car made famous recently by Jeremy Clarkson of Top Gear who purchased one himself.

Removing the photograph background but preserving foreground details for depth

In an attempt to further refine my own skills with using the "Refine Edge" function in Photoshop's Quick Select tool I made the above photograph of Kiki right here in the living room.  I knew beforehand I would be removing the background and painting in a new one.  I have really started to like using this technique lately, especially when adding a pure white background.  However, when including a full view of the subject, replacing the entire background be it with all white or any other color a lack of depth can result as the foreground and background are exactly the same.  As you can see in the finished version on the right some shadow and light remain on the floor around Kiki's paws.  After doing my usual edits to the image, the process I followed for making the digital backround was thus: 

  • Quick Select the floor area only & increase its contrast
  • Using the Eye Dropper tool select a color from the increased contrast floor (gray-ish in this case)
  • Increase the area Quick Selected to included everything except Kiki herself
  • Using the Brush tool at 100% paint the background up until the edge of the floor
  • Change the opacity to 40% and paint the floor area until a uniform gradient appears 

In am happy with the process I used to make the digital background in this case, but I would like to improve the smoothness of the gradient/transition of the background to foreground even more by using every smaller opacities to brush it in.

The finished final image of Kiki with gray background added in Photoshop leaving floor light and shadow for depthAlas there is no editing I can do to make Kiki not look like a sad puppy.  This was right before our usual dog park time and I think she was wondering why do I have to sit through this when we could already be on our way to the park!  Next time I will attempt her portrait in the morning.

Get images like these of your dog or cat or pet done right in your own living room . . . contact Jason today to reserve your shoot!

Blue Ferrari California in St. Petersburg Florida white background edit

Blue Ferrari California in St. Petersburg Florida - Nikon D300 Nikkor 50mm lens @ f/2.8 ISO 200 1/125th white background added digitallyDowntown St. Petersburg can be surprisingly good for spotting super cars and other exotics.  For example last night parked right on Beach Drive NE was this blue Ferrari California.  I was actually teaching a DSLR Photography Lesson at the time and used the car as a practice subject.  Even if I was on my own and had all the photographer gear with me I would want, it would have been difficult to produce a shot any better than this due to the neighboring cars and the busy background.  

So in making this quick car photograph I concentrated on the best detail clearly visible, in this case the front wheel and huge ceramic brake rotor and bright yellow brake calliper.  There was still the problem of the street it was parked on being in the foreground (see below image).

The original photograph straight from RAW conversion to JPG in Aperture 3 of the Ferrari CaliforniaAfter doing my usual editing workflow first in Aperture 3, then Color Efex Pro 3, I sent the photograph into Photoshop CS5 and did some selective edits (sharpening, contrast) before simply removing the car and wheel from the image and putting only that on a new layer.  Then I added yet another new layer under the car layer, painted it white, and boom, produced the best image I could of a car in a very non-ideal location.

Model headshot edit inspired by Jem the cartoon series

This editing style was inspired by the Jem cartoon series! -- Model: AbbyI was going through Netflix's always woeful list of new releases when I saw that the cartoon series Jem was now available.  I remember watching this cartoon in the 80s because of the vivid pastel colors and style of the animation.  So this afternoon I went about converting one of my own photographs into a Jem-style image.

The above is my final image next to a photo of Jem (source Wikipedia).  Maybe long before I saw Jem in Netflix I had a subconscious thought to convert the shot of model Abby into a Jem-style one as I did not really like how I originally shot the photo, but I kept it lying around for some reason.  

The first thing I did was to load the original image (see above) into Photoshop CS5.  Well, actually before that I did some slight warming to the image in Aperture 3 via Nik Color Efex Pro 3.

In Photoshop using the Quick Select Tool (W) I selected only the background of the image.  I did then click on Refine Edge to make the border along the hair look more natural and less choppy.

The next step was the key one and really how I thought I would go about making the photograph look more Jem-like and I knew how to do it entirely because of making mistakes in the past with my keyboard shortcut usage.  I always use CMD-SHIFT-I to resize images before I post them on this site and Facebook, etc.  Sometimes I end up hitting just CMD-I which is the Invert command in Photoshop.  Since only the background was selected, only the background became inverted going from black to white and the bokeh from yellow to purple, which to me is much more Jem-like!

Next to clean up the image and make the model look more like Jem does, I used the Clone Stamp Tool (S) at 40% opacity and just sampled an area then brushed over that same area repeating as skin tone and texture changed for each part of the face.  This is the quickest and easiest way I know of for smoothing skin.  Note, I did not say it was the best, just the quickest and easiest.

To further the smooth and glowing look that Jem has, I used a free Photoshop action available here.  That completed the look.  I did not intend to tightly crop the image, but after all editing was done I thought a tighter crop was a better way to feature the image.  I just hit C in Photoshop to bring up the Crop Tool.  

Try this Jem-style process out on one of your photographs and post a link to the results in the comments below!

Business Headshot on white background in Clearwater Florida with Kathy

Business headshot done on location in Clearwater, Florida - Nikon D300 Nikkor 80-200mm @ f/5.6 ISO 200 1/60th Strobist: SB-800 @ 1/2 power in 42" brolly to frame left - white background added digitally in PhotoshopThis afternoon I drove to Clearwater to meet Kathy to make her business headshot.  Earlier in the week we discussed the specifics, like how she needed both a standard vertical headshot and also a full body headshot, both of which needed to be on fully white backgrounds with no shadows.  This is easy enough to do if working in a studio, but I made these shots right in her office.  Therefore, I needed to maximize the amount of blank wall I could get behind her in the space given to make it as easy as possible to add the white background later in post.  For the above standard vertical headshot, it was no problem to do.  

Full body business headshot - Nikon D300 Tamron 17-50mm @ f/5.6 ISO 200 1/60th Strobist: SB-800 @ 1/2 power in 42" brolly to frame right & SB-600 @1/4 power with diffuser cap to frame left - white background added digitallyNow for the above full body shot, adding the white background was much trickier because as of about two-thirds of the way down the skirt the border of the wall started and then the dark blue-gray carpet began.  This made selecting the edge of the subject using the Quick Select tool in Photoshop somewhat in exact, even after refining the edges.  After placing just the subject onto a new layer and painting in a white background, I then took that same 100% white Brush Tool and tediously smoothed the edges especially around the border of the shoes, ankles and lower skirt where the carpet was.  Still, this technique allows me to make on location shots with any background the client requests.

Kathy was a great subject easy to pose and we also had help from her cheerful office mate Rosemary.

Porsche 911 GT2 RS white with black rims St. Petersburg Florida

Porsche 911 GT2 RS in white with black rims - Vinoy Park - St. Petersburg, Florida - Nikon D300 Nikkor AF-S 105mm VR micro @ f/4 ISO 200 1/2000th - black & white processing in Silver Efex Pro, white background digitally inserted in PhotoshopSitting at my desk now, before me on the wall is a large poster of the new 991 generation Porsche 911 Carerra.  I found the poster in with an edition of the Wall Street Journal.  To my left on the wall is a custom photo of a Cayman S made by Porsche specifically for me from a Facebook promotion they had last year.  In the photograph above, is the current apex Porsche, the Porsche 911 GT2 RS.  I made this photograph in Vinoy Park where the Porsche was one of several others waiting to be part of a car show the next day.  

The problem with photographing cars at car shows is that it is very hard to get a clean shot.  Choosing the angle I did insured no other cars appeared in the shot.  The background bokeh of trees and condos was busy.  In my post processing of the image in Photoshop, the final step I took was removing the GT2 RS itself from the frame and placing it upon an empty background.  I then created a new layer and inserted it behind the Porsche layer.  I painted this layer white thus removing the background distraction resulting in a clean image.

The original color photograph on left; The black & white digital white background image on the rightIn the above comparison you can see how removing the background (also in the windows too) puts the focus on the GT2 RS.  Also notice the optical illusion created by using a white background.  Doesn't the color image make the Porsche look much bigger in the frame?  However, they are the exact same size.

What does love equal? free brick wall texture

What does love equal for you? Click to download full resolution textureWhile walking around downtown St. Petersburg with camera and tripod in tow, I came across the above chalk drawing on the side of a brick wall of a church.  I stopped and paused as it really caught my attention.  To me it meant, "what does love equal to you?"  I was glad to have the proper photo gear with me to make the best high resolution texture of the drawing I could.  You can download the same full res texture here.

Beloved puppy Kiki used with brick wall heart textureI used some Photoshop skills to create the above composite image using the brick wall chalk heart texture.  What would you put in front of the equal sign?

There was more, a + sign! Click to download the full resolution textureThen I realized the artist had not just drawn an equal sign and a heart, there was a + sign also so that two things could be put together to show what creates love.  Due to wall space constraints the space before and after the + sign were not equal so I photographed them the best I could.

Might Jason + a Porsche 911 = love?Using the same Photoshop skills I made a quick mockup of what yours truly might add with to create love!  Anyone who knows me knows my love for proper sports cars, and nothing is better than a Porsche 911!

Put a link in the comments below to the composite images you create with the brick wall chalk heart textures.