digital background

White Background headshot with Casey in St. Petersburg Florida home studio

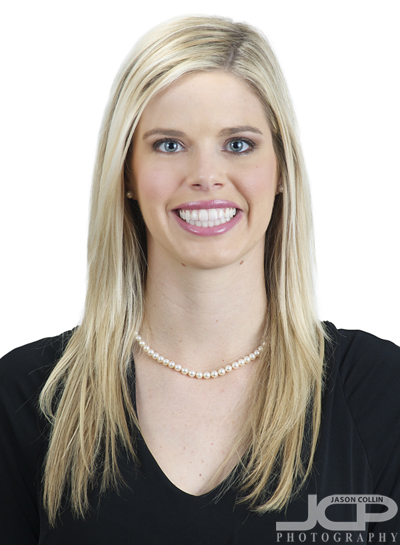
This business headshot for Casey was made right in my St. Petersburg home studio - Nikon D300 Nikkor 80-200mm @ f/7.1 ISO 200 1/160th - Strobist: SB-800 in brolly to frame right & SB-600 in shoot through umbrella to frame leftThis afternoon Casey visited my home photography studio in St. Petersburg for a headshot.  Her mom came along and was very helpful petting Kiki while the photography was going on.  It was easy to photograph Casey as she was a natural in front of the camera.  After making lighting and posing adjustments as per her request it was just a matter of pushing the shutter, cropping the image, doing a little editing, then adding a digital white background and finished.  Well, I guess it does not sound so simple after all, but anytime I do not have to worry about the client's smile, it seems easier to me!

Unique Pet Photography - Kiki & Jason out of perspective

How can you make a unique photograph?  How can you push the bounds of what a photograph can be?  A single exposure, a single shot, that can create a great pet photograph no doubt.  However, it is limiting in just how unique a shot can be.  I am always thinking of ways to make unique and interesting pet photography shots, and photographs in general.  In the above composite photograph of me and my beloved puppy Kiki, I took a shot I made of Kiki over a year ago and combined it with a self-portrait I just made this afternoon.  Below is how I did it:

I already had the shot of Kiki edited onto a white background.  The original photo was mostly white in the background, but I still used the Quick Select Tool in Photoshop to cut Kiki out of it and then paint in a digital background.  I have that photo printed out and on a shelf in my bedroom so I see it every day.  It popped into my head recently to put myself into that image to make it appear that Kiki was about to swallow me.  There was not enough space under her upper jaw for me to really be seen, so instead I used a flipped self-portrait in a perspective showing me to be actually smaller than Kiki, adding to the uniqueness and strangeness of the final composite image.

Custom Classic Van HDR at Madeira Beach Car Show St. Petersburg Florida 2013

Classic Custom Van Photography at Madeira Beach Car Show 2013 - Nikon D300 Tamron 17-50mm @ f/11 ISO 200 9-exposure HDR digital background

I went to the Maderia Beach Classic Car Show this past Sunday on a cold and blustery afternoon.  Apparently custom car owners do not much like that type of weather as there were only 8 cars there total!  Of those only one really caught my eye, a custom van that with the hood open, looked like the roaring mouth of a dragon or vulture or similar creature.  I wanted to make a shot to accentuate that feature of the car.  As is often the case at car shows, the background was not great and there was only a tight space to shoot in.  So even as I was making the shot that cold afternoon I was already thinking I about how I wanted to edit the shot and I knew I would just remove the background.

The graphic below shows what a single exposure would have looked like, a 9-exposure HDR, then the final image with all edits and digital background added.

Business Headshot in St. Petersburg Florida home studio February 2013

Dick wanted a headshot of him doing something he would actually do - Nikon D300 Nikkor 80-200mm @ f/6.3 ISO 200 1/160th - Strobist: SB-800 @ 1/4 power in 43" brolly to frame right & SB-600 @ 1/4 power in closed shoot-through umbrella to frame left and aboveFor one of his two headshots made here in my home studio in St. Petersburg, Florida, Dick wanted one of the images to show him acting naturally doing something he would actually do.  So he did a little acting to look like he was giving a presentation.  He was actually very good at it and we made the shot above on only the second take!

He was photographed on a neutral gray background.  In Photoshop I removed him from that background and painted in a digital background using pure black, then adding a slight gradient.  It was a fun shoot!

Free Christmas Tree Ornament Bokeh Background

Free Christmas tree ornament bokeh background - click to download the full resolution versionJason Collin Photography is offering a free Christmas tree ornament bokeh background to use as a digital background for composite images, as a texture to overlay or simply as a desktop wallpaper.  Click the above image to download the full resolution version.

The above portrait was made outside.  I simply cut out the subject and placed her upon the Christmas tree ornament bokeh background to add a festive holiday look to the photo.  Tell us how you used the background in the comments below.

Audi R8 HDR highly stylized black & white image Florida custom car photography

"Essence of the Audi R8"

I photographed this Audi R8 at the Cars & Couture event at Tampa International Jet Center.  There was very limited space to get any shot and from no angle was there any kind of clean background.  The rear three-quarters view I felt was the best composition given the constraints knowing that I would ultimately remove the car from its real surroundings.  The following is the digital editing process I went through in making the final image you see above which I feel shows the essence of the Audi R8.

I initially thought I could keep the existing cement floor background only making the upper half of the image a digital white background.  However, I was not happy with the lack of consistency in how the floor looked from left to right as well as having no good natural cut off point for it.  I never actually removed the floor from the background.  Through several editing steps it became lightened and smoothed out.  The silhouette filter in Silver Efex Pro essentially made it disappear, but critically leaving the natural shadows under the R8.  Although much of the body of the R8 was also lost in appying this filter, I liked that.  The remaining view of the car, basically all the black trim including the unique "blade" air intake and the black wheels, still showed enough for a knowledgeable viewer to know it was an Audi R8. 

Corvette great subject bad background digital photography editing tip

Final fully edited custom silver Corvette - Nikon D300 Tamron 17-50mm @ f/11 ISO 200 5-exposure HDR - black gradient background added digitallyWhat if you have a great subject to photograph, but a terrible background?  I tell my DSLR photography students that assuming you have a good subject, then what makes or breaks a shot, what sets it apart is the light (lighting) and the background.  For this shot the subject is a really cool custom Corvette.  However, the background was horrible and I could not use depth of field techniques to just turn the background into beautiful bokeh because the subject was too close to the background, at least if I wanted to photograph the entire car, which I did.  So, to make the shot usable I opend up my digital photographing editing toolkit.

So what did I do first after processing the HDR image and do a few little minor edits?  I loaded the photo in Photoshop (I still use CS5) and chose the Quick Select (W is the keyboard shortcut) tool.  The background looks very busy and it might seem like selecting the Corvette would be difficult, but there are several factors why it was not too tedious.  One is the Corvette is a fairly distinct, blocky object, no lone thin parts or openings.  Second, none of the surrounding colors are similar to the Corvette itself.  The hood did take a little fine tuning to get selected, but other than that it was not too bad.  Notice I selected the naturally existing shadow under the car too.  Once finished I clicked on the Refine Edge option up in the Quick Select menu bar.

In the Refine Edge window you can clean up the extra bit of edging that you do not want as well as export just the selected subject to a new layer, which is what I always do.  Once that is done, I add a new layer to use as a background that I can paint any color.  I usually choose white first to see how it looks and also to make sure I really cleaned up all the edges.  I liked the white background, so I saved a JPG from the PSD project.

Next I just painted over the white background with the Brush Tool at 100% opacity black.  Right away I liked the black background better as I thought it made the silver Corvette pop out.  The black background caused the shadow to become invisible and kind of made the shot look a little two dimensional, so the final touch was adding a 40% opacity vertical gradient only from the mid-height point of the image.  

This process can of course be used for any subject with a variety of digital or real backgrounds.  So the next time you see a really cool subject, but are disappointed by the background, be sure to still make the shot in the field knowing you can using a few Photoshop techniques to produce a final image you will be happy with.