brolly

Using a collapsible background to make a home photography studio St. Petersburg Florida

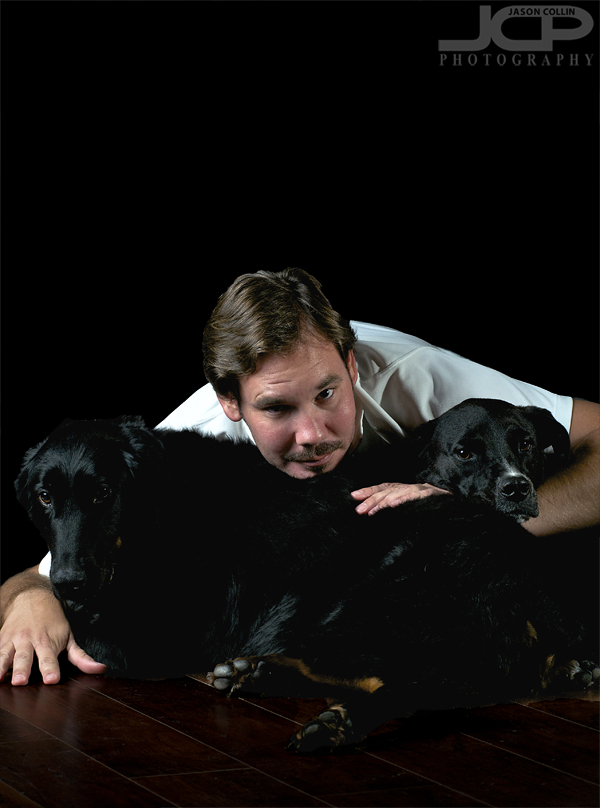
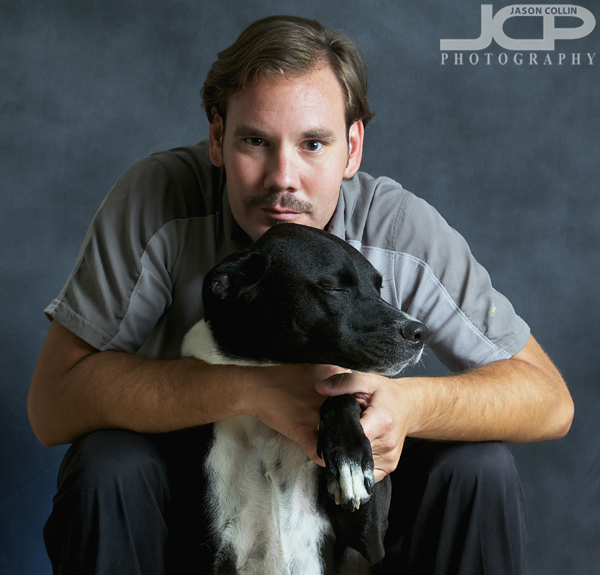
Kiki & I in a self-portrait featuring my new Botero Collapsible Background - Nikon D300 Tamron 17-50mm @ f/5.6 ISO 200 1/60th - Strobist: SB-800 in brolly to frame right & SB-600 pointed up at background with blue gel and HONL snoot (open)I am always looking to improve the range and quality of photography products I can offer to clients.  In the pursuit of this I invested in a collapsible photography background (view on bhphotovideo.com) that measures 5'x7' is neutral to dark gray and folds up like a car sunshade into a circle when not in use.  Such a background allows one to setup a small studio space virtually anywhere, including your own living room.  

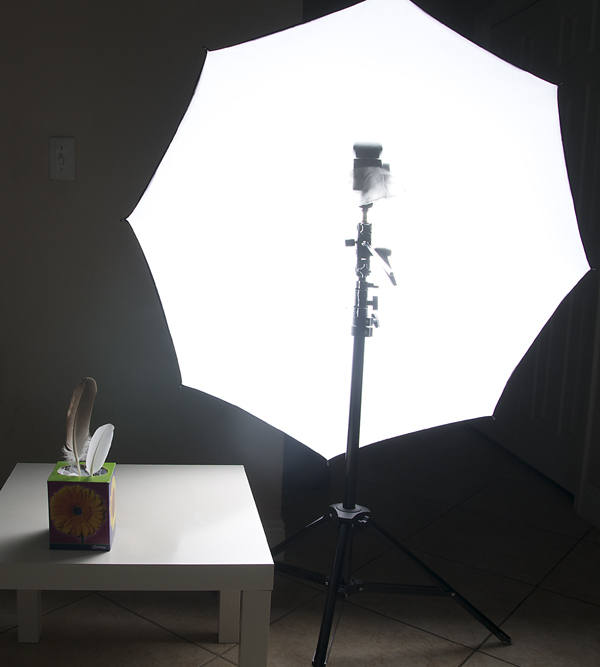
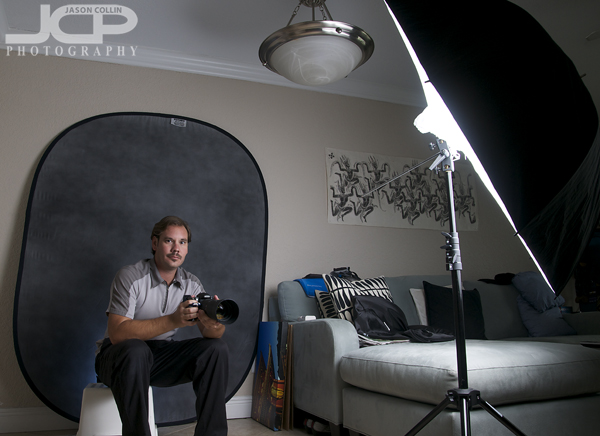
My new home studio setup featuring a 43" brolly on a light stand, 5'x7' collapsible background & gelled speedlight (behind me)The collapsible background does not require any special holder or stand.  I simply took a canvas print off the wall and rested the background up against it.  It took a little fiddling and flipping it over to get it to stay in the space I wanted it too, but all-in-all a pretty easy setup.  The background is easily big enough for two people, and maybe three or more depending on how they are posed.

This self-portrait headshot took MANY takes to make!If you like to make portraits and do not have the space to maintain a dedicated photo studio in your home, then my photography tip is to invest in a collapsible background that can be used in any room in the house and easily taken over to the homes of friends and family too.

Business Headshot St. Petersburg Studio with digital background - Carol

Business Headshot made right in my St. Petersburg home studio for a client - Nikon D300 Nikkor 80-200mm @ f/8 ISO 200 1/100th - Strobist: SB-800 @ 1/4 power in 43" brolly to frame right & SB-600 @ 1/8th power with diffuser cap to frame leftCarol visited my home studio this afternoon for a new business headshot.  She was an excellent client and knew how to get into position well.  Before we started shooting I showed her a few different lighting and background options.  Through the process of making the headshot we decided upon a slight shadow and a digital background for the image seen above.  The real background was a light tan wall that I removed and in its place inserted a gray-blue one.  

Making a portrait of any type is a collaboration between photographer and subject, and this time I involved the client in more of the process than I usually do as I was even able to show her on my computer monitor a rough sample of what the headshot would look like on a given background.

I offer business headshots both at your location or in my home studio (as long as you do not mind Kiki).

Feather strobist macro images done in home

A found feather photographed right in my living room - Nikon D300 Nikkor 105mm vr micro @ f/8 ISO 200 1/250th Strobist: SB-800 @ 1/4 power in brolly behind feather to the rightWhere does one get photograph ideas?  Well, often from looking at other photographs.  I remember in passing seeing just a feather photographed on a dark background.  So when I was walking around Crescent Lake Park last weekend, home to many birds, and I saw some feathers on the ground, I took two home to experiment with.  I am not 100% satisfied with the results, but I learned more about what kind of shots I can make right in the tight quarters of my own living room.

A found feather photographed right in my living room - Nikon D300 Nikkor 105mm vr micro @ f/8 ISO 200 1/250th Strobist: SB-800 @ 1/4 power in brolly behind feather to the rightNow that I have tried this feather photograph experiment I realize in the future how I would position things differently in order to produce results more like I previsualized.  Finding more colorful feathers might add more to the shots as well.

I stuck the feathers through the top of a tissue box to get them to stand up straight and position the brolly on a light stand well behind the feathers so as to have minimal light spill on the wall behind the feathers which I wanted to be as dark as possible.  If you already have a DSLR and an external flash, then getting the gear seen in this photo (brolly, light stand, umbrella head, radio triggers) to allow you to start having strobist fun, would require around $100.

Strobist fun with friends & dogs

Terry holding his dogs Lucy & Sadie with my dog Kiki frame left - Nikon D300 Nikkor 80-200mm @ f/8 ISO 200 1/250th Strobist: SB-800 in brolly to frame left & SB-600 on a chair to frame rightOn a recent visit to eldest friend Terry's house I brought with me a good bit of my strobist portrait gear planning to make some images of us with our dogs.  This involved not only getting the lighting and logistics correct for shooting in his living room, but also giving Terry some quick tips for how to shoot using my Nikon D300.  Once I got the above image of him with my dog Kiki and two of his three dogs, we switched players and I began coaching Terry how to first focus on my eyes and then recompose all while holding down the shutter halfway and shooting from a position lower than my eye level.  He learned fast, which should not be surprising as he was the valedictorian of our high school class after all!

Yours truly with Kiki & her best friend Sadie - Terry pushed the shutter on this one - Nikon D300 Nikkor 80-200mm @ f/8 ISO 200 1/250th Strobist: SB-800 in brolly to frame left & SB-600 on floor to frame rightHere is the image Terry and I created together.  This is all without mentioning the random element of the dogs and their movements, who were actually rather stoic for them.  Once Sadie laid down I got Kiki to come in behind her and I just rested on both of them, Terry was in position, and boom, we got the above shot.

Lucy kissing Kiki - background added digitally - Nikon D300 Tamron 17-50mm @ f/8 ISO 800 1/60th SB-800 hotshoe mountedLucy was hanging off the sofa with peoples' legs in the background for the above shot, but I liked the kiss Lucy was giving Kiki so I took both dogs out of that busy background and then using Photoshop painted in a color sampled from Lucy's own hair color with a slight gradient added as the final touch to the digital background.

All these shots were done in just a few moments of time, just a fraction of the time we were there, but now thanks to a little photography know-how we will always have these memories of our dogs together.  

Film Noir Model Portfolio Shoot St. Petersburg Florida with Alexandra

These are actually post office steps! The neon in the background is real, though modified - Nikon D300 Nikkor 80-200mm @ f/5.6 ISO 400 1/160th Strobist: Nikon SB-800 Speedlight @ 1/4 power in 43" brolly to frame left & Nikon SB-600 Speedlight @ 1/2 power with diffuser cap to frame left

I cannot say I explicitily intended for my model portfolio shoot with Alexandra to turn into a film noir style, but through editing of the images it certainly turned out that way.  We were shooting in the late evening from about 7:45pm to 8:25pm mostly around the Arcade in downtown St. Petersburg.  The Arcade is a great location offering a variety of shot opportunities, especially at that late time of day with all its shadow opportunities.  The above shot was actually the very last shot of the shoot.  The background features the neon sign of a cafe across the street with the contrast selectively turned up so that only what is illuminated by my speedlights and the neon remain visible.

Using long shadows created by a speedlight outside the gates - - Nikon D300 Nikkor 80-200mm @ f/4 ISO 400 1/160th Strobist: Nikon SB-800 Speedlight @ 1/8 power in 43" brolly to frame left & Nikon SB-600 Speedlight @ 1/2 power with diffuser cap to frame leftI chose the Arcade as a shooting location because of the great, very tall, ornate, iron gates.  I knew they would make for a fantastic background and/or prop.  For the above shot I placed a speedlight outside the gates to frame left in the alley to help cast long shadows in the foreground.  I composed so to accentuate them.  Alexandra came up with a great pose taking my one small suggestion to create space between each arm and her body, something I always make sure is set otherwise the model will appear to have a lumpy body or strange attached arm.  Alexandra in fact did a great job overall allowing me to focus on creating mood and atmosphere with my lighting and composition.

The 43" brolly creates soft shadows, I love it - - Nikon D300 Nikkor 80-200mm @ f/4 ISO 400 1/160th Strobist: Nikon SB-800 Speedlight @ 1/8 power in 43" brolly to frame left & Nikon SB-600 Speedlight @ 1/2 power with diffuser cap to frame leftThis shot features the same gates and lighting setup.  Without the speedlight outside the gates providing backlight, the gate on frame right would appear dull and lack the reflective light on it.  Additionally, the same speedlight provides rim light around the model, especially her hair, right arm and right side.  A photographer can do a lot with just two speedlights positioned in key spots.  I could carry all my strobist and photography gear that I used for this shoot myself, following the "lighten up and shoot" philosophy.

A single strobe setup with intentional background shadow - Nikon D300 Nikkor 80-200mm @ f/4.5 ISO 400 1/160th Strobist: Nikon SB-800 Speedlight @ 1/8 power in 43" brolly to frame rightThis shot is different than all the others in that it features only one speedlight positioned to create Rembrandt lighting (nose & cheek shadows touch leaving a little light under the eye) on the model.  I wanted to include one soft feeling image in the shoot as most of the others were really strong from a posing and overall feel perspective.  

Thank you again to Alexandra.  You can follow her work on Model Mahem and Facebook.

Business Headshot in St. Petersburg Florida on Location with Al of Bayprint

Business headshot done on location in Bayprint - St. Petersburg Florida - Nikon D300 Nikkor 80-200mm @ f/9 ISO 200 1/100th Strobist: SB-800 @ 1/4 power in 42" brolly to frame left

This morning I had a very fun business headshot shoot with Al of Bayprint.  I have known Al for sometime now first meeting him through the Third Tuesday networking event he hosts every month.  Nowadays I also see him once a month as he hosts a small business roundtable discussion.  As you can see, Al is very generous with his time and is a great networker.  

I went to his print shop in St. Petersburg and used the blank wall right in the breakroom for the background for the above shot.  The goal for that particular shot was to include the Bayprint logo on his shirt in the frame and overall have the headshot not look too corporate, which is why Al is not looking straightahead nor directly into the camera lens.

A fun headshot Al will use on his blog - Nikon D300 Nikkor 80-200mm @ f/9 ISO 200 1/100th Strobist: SB-800 @ 1/4 power in 42" brolly to frame left - gray background added digitallyFor the last shot of the headshot session, Al wanted one with his arms crossed kind of looking intimidating to use as a fun image for his blog, etc.  I used the Quick Select tool in Photoshop and then the Refine Edge function to cut Al out of the background you see in the top image and placed him on an empty background.  I then added a new layer under the cut-out image of Al, painted it black, then added a single gradient diagonally to create the new background in the above shot.  This is how I am able to make shots on location right in an office and still offer the client any choice of background.  

Thanks Al and I will see you at future networking events!

Kiki yawning studio like white background pet photography done in home

Kiki's mouth opens too wide when yawning to even fit in the frame! - Nikon D300 Nikkor 105mm VR micro @ f/8 ISO 200 1/60th Strobist: SB-800 @ 1/4 power in brolly to frame rightI have been doing quite a few in-apartment photo shoots featuring white backgrounds added digitally lately of various subjects and inevitably when I finish them before I put my photography and strobist gear away I make a few photographs of beloved puppy, Kiki.  I cannot say she is always thrilled about this.  Her expression is usually pretty neutral.  This time I interrupted her naptime resulting first in a yawn then the look she gave me (see below).  

Kiki looking very nonplussed as she usually does for photos - Nikon D300 Nikkor 105mm VR micro @ f/8 ISO 200 1/60th Strobist: SB-800 @ 1/4 power in brolly to frame rightSince these photographs were made in the close confines of my living room, and even though the great Nikkor AF-S 105mm VR micro f/2.8G macro lens makes great bokeh, the backgrounds were still a distraction, which is why I chose to do a Quick Select of just Kiki in Photoshop CS5 and then refine the edges and send that image onto a new layer (done automatically if you choose the right output).  I added a layer below Kiki, painted it white, and voila, a studio looking image of Kiki done right in my own living room, no mess, no fuss.

Get images like these of your dog or cat or pet done right in your own living room . . . contact Jason today to reserve your shoot!