Photoshop

Photography Tip - Invert colors to make photos look psychedelic

I often hit Invert in Photoshop by accident because the command for resizing is close to it and as I often work very quickly in Photoshop, sometimes a very crazy looking image flashes on my screen.  However, this also means happy accidents happen too.  

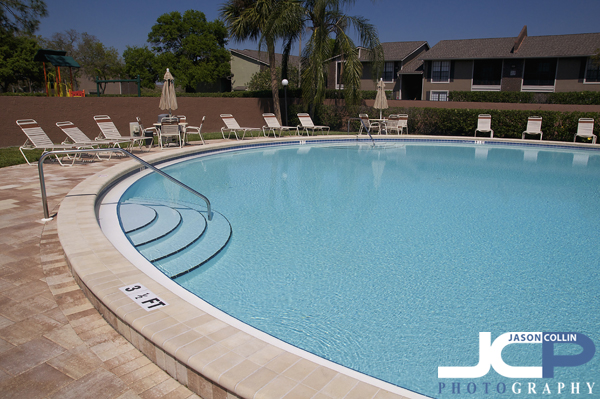
I was editing this ordinary pool photo from a real estate shoot and as I was finishing it and preparing it for web size, I went to hith CMD-SHIFT-I but missed the SHIFT part and instead only hit CMD-I resulting in the below inverted color version.

Looks much cooler, right?  So if you are needing something to spice up a photo, try hitting CMD-I in Photoshop next time and you may be pleasantly surprised!

Psychedelic Pelican of St. Petersburg Florida

A psychedelic pelican composite image made using a layer mask in PhotoshopI had two images lying around in my random folder for months.  One was a graffiti wall I photographed knowing someday I would use it as a texture background.  Then I had this kind of wide-eyed pelican photo.  This afternoon I thought to combine them for a psychedelic looking fine art photograph.  In Photoshop I placed the graffiti wall image right over the pelican photo.  Then using a layer mask I was able to brush away the wall to reveal the pelican underneath, as well as choosing the blend mode for the overall look.  This is actually a fairly simple Photoshop skill.  To get more of an idea of how the combo process works, check out this blog post.

Resize photographs to exact sizes with Photoshop for best online presentation on Facebook & Linkedin

What is the final step in editing digital photos that you will display online?  Resizing.  This is a very simple thing to do, but very important for presenting your photographs online in the best possible quality.  Just uploading full resolution images is very rarely the way to go for a number of reasons.  One is that it takes up a lot of space and many websites do not allow large file uploads.  Secondly, who knows what kind of recompression and resizing websites use in presenting your images.  This is why every single image you see of mine online has been exactly resized in Photoshop to the best possible size for the location it is displayed on.  

In the above screenshot you can see the Photoshop Image Size dialogue box.  The Mac keyboard shortcut to get to it is: OPTION-CMD-I or you can go into the menus:  Image --> Image Size.  I use pixel count to resize my images.  Every image in the blog section of my website (you are looking at it now) is resized to 600px on the width maximum because that is what fits within the body portion of the blog page.  Photoshop will keep the height in proportion automaticaly when I type in 600px for the width, see it chose 399px for the height in the above example.

There is no loss in image quality when resizing in Photoshop, which is why I use it for all my images.  If I just let Squarespace (my content management system) resize a much larger image for me, that will eat up my alloted storage space much quicker and worse, may not display my photographs in maximum quality.  There could be pixelating resulting from poor resizing.

In the headshot example above, each one is 250px on the width.  The image on the left shows what can happen if a smaller image is stretched to a larger size.  A lot of detail in the image is lost.  The headshot on the right was resized from the original photograph to exactly 250px and looks like the full resolution image in detail and quality.  The same poor image quality can result if you upload a huge image then compact it into a much smaller space.  This has happened with past headshot clients actually.  Most website profile photos are only about 200px on the width, which is the case for popular networking site Linkedin.  So when the client uploads their full resolution headshot (2000px or larger) and Linkedin tries to squeeze that into just 200px worth of space, the image will look horrible.  In the case the client did not have resizing skills, I sent them a 200px version of their headshot.  

Facebook is a photograph displaying disaster.  They remain the only site that degrades image quality that I know of.  It is preposterous that they do it when no other photo intensive site does.  Still, it is an important place for me to show my work so I do upload my photos to it.  Even though I resize my images in Photoshop to Facebook's exact required dimensions, their resampling engines go to work on my images reducing their image quality.  

Since adding the feature to display a cover image to a Facebook profile, I have seen an increase in strangely sized and proportioned images on Facebook.  The exact dimension required is 851x315.  Nice even numbers you can remember easily right?

So how can you resize your photo to fit a Facebook Cover image space and minimize the image quality reduction Facebook will apply to the image anyway?  Load the image in Photoshop, choose the Crop Tool, and enter in the pixel dimensions of 851x315.  Select the area of the photograph.  Since 851x315 is a strange proportion, you will almost never be able to fit your whole photo in that area.  Once you crop the image to the right ratio, you still have to resize it.  Then go into Image Size as described above and type in 851 for the width.  Now you can upload a photo that will fit perfectly into the Facebook cover image spot, but you will notice the quality reduction applied despite this.

Snow Leopard Photoshop edit removing cage fencing from photograph

This week one of my former photography students, Betty, contacted me about editing a photo she made that she really liked, but had one serious flaw.  She told me she wanted to be able to make a print of a photograph of a snow leopard she had made, but.....there was facing across the entire image.  She asked if I could remove it.  Upon first looking at the sample she sent I thought no way, at least not in a way that would look good.  However, I often think this initially when looking at a challenging photo edit and after some time my brain starts to formulate some possible solutions.  Still, there was one fatal part of the photo that could not be fixed, the cat's right eye.

Lines and blemishes over and across simple surfaces are usually not hard to correct, such as the case with the wires goings over the fur of the leopard.  However, anything over eyes basically provides an unfixable problem.  After some thinking....my solution?  Copy the cat's left eye, mirror it, and just put it over the problematic right eye!  

It worked better than I thought it would.  To add some differences I removed some reflections in the "new" right eye along with a few changes to the upper eye brow area.  I will not say removing the rest of the wiring was easy or simple, but those edits were a much more straight forward technique of first using the healing brush and then the clone stamp tool to clean up any lingering obvious edits.  Photoshop CS5 was used for these major lifting edits, as I call them.

After removing all the wiring I then applied my normal digital editing workflow to the image to produce the final, fully edited photograph above.  So the next time you think a photograph is impossible to fix in Photoshop, give it a few minutes and maybe a solution will come to you.  Or, send the photo to me as I offer digital photo editing services of all kinds.

Photography Tip - replace a busy background with clean sky Corvette Photography

This Corvette is real, and the sky is real, but they were not really photographed together.

I went to a Corvette car show in South Straub Park this past Saturday mostly to meet the owner of the above customized Corvette.  I first photographed his car back in November.  He was not by his car at the time and only by chance found my photograph of it.  Since then I have been in regular contact with the owner, Bobby, about possibly doing a full shoot of his Corvette.  That still has not happened yet, but at least on Saturday I got a chance to go see him and say hello.  

This is the original image as made on site at a car show in St. Petersburg FloridaI have written several times that shooting cars at car shows often results in less than desirable images, if you want the focus to be on the car itself.  This case was no different as the trees in the background compete for the viewer's eye just as much as the Corvette.  The solution for a busy background?  Replace it with a better one!

Corvette cut out from the background using Photoshop Quick Select ToolIt was pretty straight forward to remove the Corvette from its background using the Quick Select Tool in Photoshop.  I kept the grass foreground as seen above.  I was careful to of course not select the inside of the window so that too could be part of the background replacement.

The replacement background used in the composite image.I went into my photo archives to look for a suitable replacement background.  Using actual objects is rather hard to do as proportions can be very difficult to match (car looks giant, buildings look tiny, etc).  A sky background is usually a good and easy replacement background subject.  I used one I made of Sunset Beach on Treasure Island, Florida.

The new background slipped right behind the Corvette, window included.Then it is just a matter of slipping the sky background layer behind the Corvette layer in Photoshop.  I positioned it taking into consideration cloud placement.  I did not even need to cut out the sandy beach part because that is all hidden behind the Corvette.  The above image is the final composite photograph which allows the viewer to focus on the Corvette as the subject.

Motion blur added to a more advanced edit of the Corvette composite image

After getting a composite image I liked, I experimented with even more Photoshop editing.  I added a motion blur to the grass and a radial blur to the tires to create the illusion that the Corvette is speeding along on the grass.  I darkened the window and put in a silhouette of my own head to show a driver inside to help complete the motion illusion.  What do you think of the motion shot?  Is it convincing or not quite there yet?

Digital Photo Editing Lesson with Stacy - prom couple before and after

The past few weeks I have been teaching former Morean Arts Center photography student, Stacy, how to develop a Mac digital photo editing workflow.  She is new to Mac as well, so I have been showing her some of my top tips for using OS X as efficiently as possible (hint, use Expose every day).  She also got the same apps I have so she could learn my exact photo editing workflow which starts in Aperture 3, then Color Efex Pro 3, then finally Photoshop CS5.  

Stacy made this photo of her daughter and her boyfriend on their junior prom night.  No flash was used, only natural light.  Here is the process for how the photo was transformed:

Aperture 3 workflow:

  • white balance slider increased toward cooler (blue)
  • shadows slider increased
  • mid-level contrast slider increased
  • dodging brush used on all skin areas

Color Efex Pro 4 (she has 4, I use 3):

  • Polarization filter applied
  • Pro Contrast filter applied

Photoshop CS5 (approximate steps):

  • Quick Select Tool used on all skin areas
  • Dodge Brush used selectively
  • Healing Brush used for blemish removal
  • Clone Stamp Tool used for more complex blemish removal and slight skin softening in general
  • Dodge Brush used in highlights mode to brighten eyes & teeth
  • Clone Stamp Tool used to lighten under the eyes
  • Quick Select Tool used on water
  • Contrast adjustment made selectively to water
  • Quick Select Tool used on sky
  • Highlights adjustment made selectively to sky
  • Saturation adjustment made selectively to sky
  • Unsharp Mask filter applied

None of these individual techniques is advanced.  To a properly trained Photoshop professional they might even seem crude.  However, what each technique lacks in complexity, the complexity comes from knowing when and how to use each one to accomplish a photo retouching goal.  At each stage of editing the photo looked better.  Through experience it can be learned how to keep adding yet another stage to one's editing workflow to make a photograph reach its full potential, or in some cases, save a photo that would otherwise be culled.

Chrome Nissan GT-R at Festivals of Speed 2013 St. Petersburg Florida Car Event Photography

Chromed Nissan GT-R at the Festivals of Speed 2013 event in St. Petersburg Florida, highly stylized & editedAt the Festivals of Speed 2013 car event in St. Petersburg, Florida, there was no shortage of cars getting a lot of attention.  However, a chrome Nissan GT-R was getting more than most.  Anytime you chrome out a car, it is going to be eye catching.  Whether such a finish to a car is to your taste or not, you cannot help but stare at it.  Since this GT-R was surrounded by people, I had to do a lot of editing in Photoshop and other apps to get a final result I liked.  Below I show the process.

I chose to completely replace the sky because that was much, much easier to do than to edit out the people and trees in the existing background.  This way I only had to select the car and foreground and then place that on a new layer and slip in behind it a blue sky I had in my archives.  The choice to go infrared was because of how black it made the sky, and in contrast how shiny the car looked in comparison.  Editing out the reflections in the car was just a tedious process that needed to be done to complete the look.