composition

Photography Tip - point your shadow at the subject

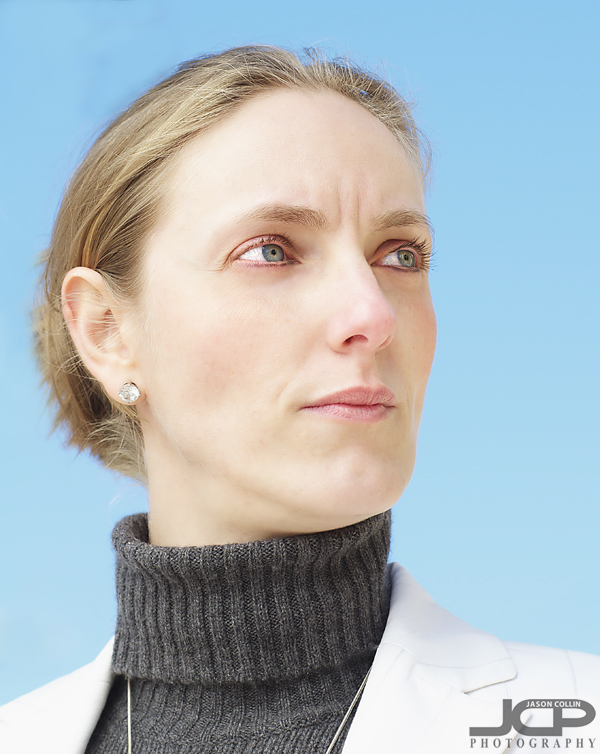
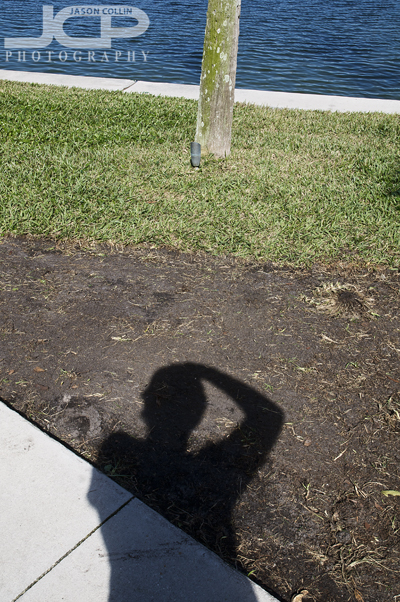
Point your shadow at the subject to get the best exposure chance.Pointing your shadow at the subject is the photography tip I have given the most perhaps.  I have told it to every past photography student (300 and counting!).  The most common way to express this though is to say put your back to the sun to help get the best exposure when shooting outside on a sunny day.  I find it is even easier just to point your shadow at the subject.  For a subject you can move, then definitely place yourself between the subject and the sun so that your shadow is pointing at the subject and your back is to the sun.  Sometimes of course the subject cannot be moved so then you have to compromise or come back at a different time when the sun would be behind you.

For moving subjects I follow this same rule.  I will position myself as much as possible with my shadow pointing in the general area of the subject and wait for it to move in front of me.

Pointing your shadow at your subject will give you the best chance at getting a good exposure throughout the photo when shooting during the day.  It's a very simple way to dramatically improve your final image.  Let me know how it works for you.

Photography Tip - use repeating patterns & shallow DoF composition

These are hanging lights in a dark restaurant. I just popped in and asked someone if I could make a quick photograph of them.I do not often give composition tips, nor get around to teaching them so often in my 1-on-1 DSLR photography lessons because I usually focus on the practical aspects of making a well exposed and sharp image in any given shooting conditions.  Once someone knows how to do that, then the creative aspect of photography can come into play, and that is something that can only be taught to a certain extent anyway.  Either you have talent composing a photograph, or you do not.

Of course there are some composition tips that can definitely help out, or if you find yourself using the same composition style over and over, reading a few new ideas can provide some new inspiration.  

These are hoops on a rack in an accessories shop. Same situation, I asked someone inside if I could take a few photos, and they said yes!The two example photos in this blog post show a combination of two composition techniques, the first is obviously shallow depth of focus (DoF) and the other is repeating patterns.  The latter is something I am always looking for when out in the field.  I am a big fan of including repeating patterns, the more creative and abstract the better, in photographs.  Shallow DoF can be used on any subject matter, but when combined with a repeating pattern I feel has an even greater visual impact. 

Photography Tip - fill the frame corner to corner - Florida Pelican Fine Art Photography

Fill the frame corner to corner to make an impact with composition - brown pelican St. Petersburg Florida Fine Art Photography - Nikon D300 Nikkor 80-200mm @ f/5.6 ISO 200 1/250th

At any given moment, you can find a brown pelican to photograph in downtown St. Petersburg, Florida.  Chances are you already have numerous pelican photos in your archives.  This can be said for any number of common subject matters.  So how to make such a common subject stand out?  One way is to use a more creative composition, like having the subject fill the frame corner to corner.  Use the shape of the subject to fill the frame in the most complementary way.  For the pelican, with it's long narrow head, going diagonal corner to corner allows for filling the frame with the subject.  Also, going through the edges of the frame creates a very different impression than fitting everything inside (with any subject it also helps to have a good, clean, complementary background; in the above photo the dark water of Tampa Bay combined with the large aperture I chose creates a smooth, gray bokeh).

When you go out shooting next time look for a subject that you can frame corner to corner.  

Photography Tip - when to leave space above subject in a portrait and when not to in composition

During my 1-on-1 DSLR Photography Lessons students often practice portraits, which means I often have to be the subject.  I alway let the student use their instict first for composing a portrait, rather than giving them composition tips first, so I can see their natural eye for composing.  A vast majority of the time this results in a portrait of me looking tiny and kind of in the photo by accident.  By that I mean I am usually dead centered (an issue for a future photography tip) and very low in the frame with lots of space above my head.  This results because I was composed to be dead center horizontally and vertically and most of the time was cut off at the waist.  I doctored the above photo to show excess space above the heads of the subjects that is just doing nothing.  It adds nothing to the photograph and in fact just makes the subject look smaller in the frame for no reason.

This is how the photograph looked as I shot it in the field, with minimal space above the heads of the subject allowing the subjects to fill the frame vertically and look like normal adult sized people and definitely in the photo on purpose.  

The rule here is:

--when photographing people from the waist up do not leave space above their heads

If you photograph someone from the waist up and leave a bunch of space above their head, then it looks like you might not have intended for them to be in the shot in the first place.  At the least, the person looks lost in the frame and tiny, which is not very flattering!

In contrast, when framing the shot to include the subject from head to toe, especially in portrait orientation, leaving space above the subject's head can add perspective to the shot.  The space above the head is then not just empty useless space.  Since you are showing the entire body of the subject, it puts the subject into a proper, normal looking perspective to the viewer.

Even in landscape orientation, if you show the subject from head to toe, leaving lots of space above the subject's head will help to show the scale of the environment the subject is being photographed.  In the example above, showing the wide open beach and water surrounding the children (shown head to toe) does show them properly as they are, small kids.  

The next time you make portraits, be mindful of the space above the subject's head.

Photography Tip - get the subject's head above the horizon

This photography tip is a long time in coming as it is one of the things that bothers me the most, that being having the horizon cut right through the subject's head in portrait photography.  Living in Florida there is never a beach very far away, meaning there is a distinct horizon in the background of photographs.  When composing a portrait, I always make sure the subject's head is above the horizon for a single subject.  Sometimes in group shots with very tall people and kids mixed, it is not always entirely possible, but for sure I will have the adult's heads above the horizon.  

So when you are out shooting on the beach next time, or anywhere that the horizon can clearly be seen, be sure to get the subject's head above the horizon.  The horizon going through the head of the subject is very distracting.  Just get lower when shooting to avoid this.  When photographing children, like in the example above, you may have to get quite low, often going on to one knee.  It is worth it though!

Photography Tip - anchor your photo composition with a foreground subject

Use a foreground object to anchor the composition of your photographs.One way to improve photograph composition is to use an anchor in the foreground.  This foreground object will give the viewer a place to start looking and then keep their eyes on the photograph.  If the sailboat in the above shot was not there, then it would just be a loose photograph of some water and sky with nothing to grab the viewer's eye.  Having an anchor adds strength to an image.  In composing landscape shots especially, try to include an anchor in the foreground.

Portrait Photograph Tip - set the focus on the eyes

When making a portrait, set the focus on the eyes, then recompose.I always use a single focus point when photographing still subjects.  Most of the time I keep that single focus point in the center, and the recompose how I want the final image to look.  Of course for shooting still subjects I use AF-S (one shot) focus mode.  So when making portraits using the settings described previously, I set the focus on the subject's eyes, then recompose because the most important thing with a portrait is getting the eyes in focus.  

Very rarely do I center subjects, and in a portrait the eyes of the subject are not very likely to end up perfectly centered as well.  In the above shot I first put my center focus point on the subject's eyes, then recomposed to put her eyes in the upper third of the frame (also her right eye ends exactly at the right horizontal third).

So when making portraits, set the focus on the eyes, then recompose how you like.